
 Английский
 中文简体
中文简体 Русский
 Español
 Português
 Türkçe
 العربية
 Deutsch
 Polski
 Italiano
 Français
 한국어
한국어 ไทย
ไทย Tiếng Việt
 日本語
日本語





























УФ камера старения
Руководство пользователя
Применимый LISUN модели: UV-263LS
1. Распаковка и знакомство с оборудованием.
1.1 Основные технические характеристики
| LISUN Модель | УФ-263ЛВ | UV-263LS | УФ-263LT |
| Структура корпуса | Трапециевидная внутренняя камера | Square Inner Container | Настольный корпус |
| Inner Chamber Dimensions (W x D x H) | 450 × × 1140 500 мм | 550 × × 1140 450 мм | 500 × × 400 400 мм |
| Габариты внешней коробки (Ш x Г x В) | 600 × × 1325 1500 мм | 650 × × 1300 1750 мм | 930 × × 460 630 мм |
| Диапазон температур | RT +10°C до 70°C | ||
| Диапазон влажности | ≥75% относительной влажности | ||
| Система управления | Программируемый контроллер с ЖК-дисплеем имитирует воздействие ультрафиолетового излучения, высоких температур, высокой влажности, дождя, конденсации, темноты и других условий. | ||
| Характеристики УФ-лампы | 8 люминесцентных ламп US ATLAS, длиной 1200 мм, мощностью 40 Вт каждая, срок службы каждой лампы — 1000 часов. | Сделано в Китае, 20 Вт на лампочку, всего 3 лампочки. | |
| Wavelength Range of UV Lamps | Standard UVA-340 lamp: Wavelength range 315–400 nm, peak wavelength 340 nm (Optional UVB-313 lamp: Wavelength range 280–315 nm, peak wavelength 313 nm; Additionally, a UVA-351 lamp is available as an option: wavelength range 315–400 nm, peak wavelength 351 nm) | Standard UVA-340C lamp: Wavelength range 315–400 nm, with a peak wavelength of 340 nm (UVB-313C available as an option) | |
| Интенсивность облучения | 0.35–1.2 W/m², adjustable (with built-in irradiance meter) | ||
| Температура облученной доски | 50–70 ° C | ||
| Размеры образца | 48 штук, 70 × 150 мм | Irregular specimens | 18 штук, 70 × 150 мм |
| Источники воды и водопотребление | 8 to 10 liters of purified water or distilled water per day (to be provided by the customer) | ||
1.2 Распаковка и проверка содержимого
1.2.1 Распаковка и визуальный осмотр
При распаковке оборудования обращайтесь с ним осторожно, чтобы не поцарапать корпус острыми предметами. После распаковки сначала осмотрите внешний вид основного блока, чтобы убедиться в отсутствии видимых деформаций, вмятин или отслоения краски, а также в том, что приборы и кнопки на панели не повреждены и не расшатаны. Если вы обнаружите какие-либо повреждения или деформации оборудования или принадлежностей, не включайте его. Свяжитесь с нами. LISUN обслуживание клиентов немедленно.
1.2.2 Основной блок и принадлежности
UV aging test Chamber (main unit): 1 unit.
Unless otherwise specified, this equipment does not include any other accessories.
Download links for the electronic user manual, warranty card, and other documents have been sent via email. Please download them as soon as possible. If you missed the email, please feel free to contact us to request the download links again.
1.3 Описание конструкции оборудования
1.3.1 Front and Right Side of the Test Chamber
① Touchscreen; ② USB port for software updates or exporting test curves; RS-232 port (for backup); ③ Power switch; ④ Alarm—sounds when the device detects an abnormality, such as a lack of water; ⑤ Test chamber door; ⑥ Drain valve—open only when draining the water tank is necessary.
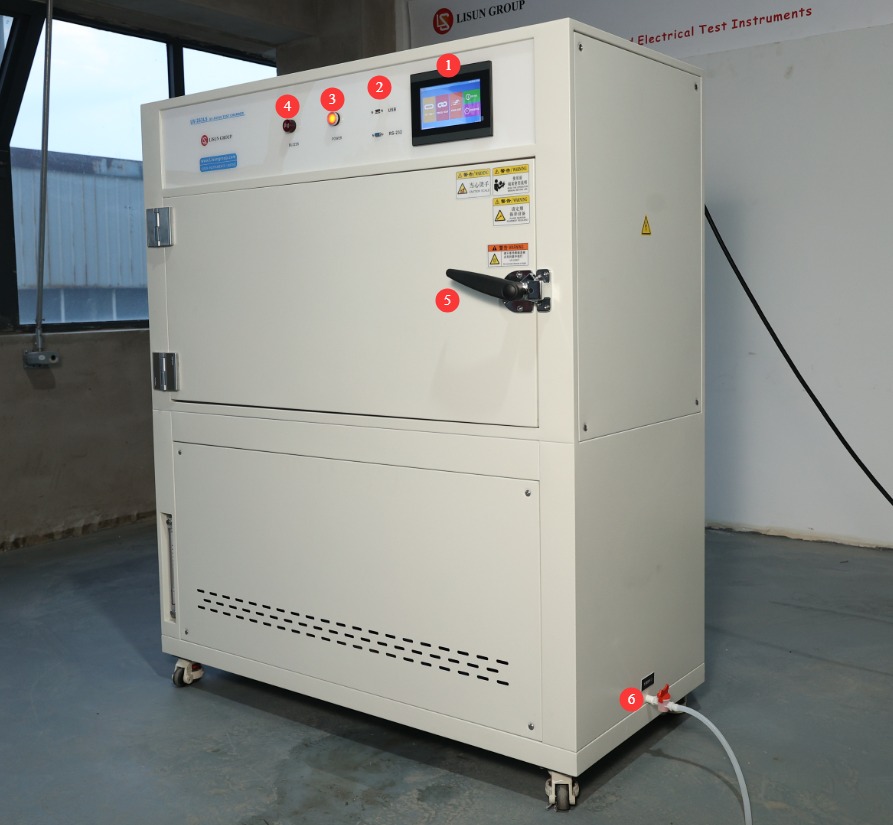
Рисунок 1
1.3.2 Left Side of the Test Chamber
① Water-filling drawer; ② Water level viewing window.
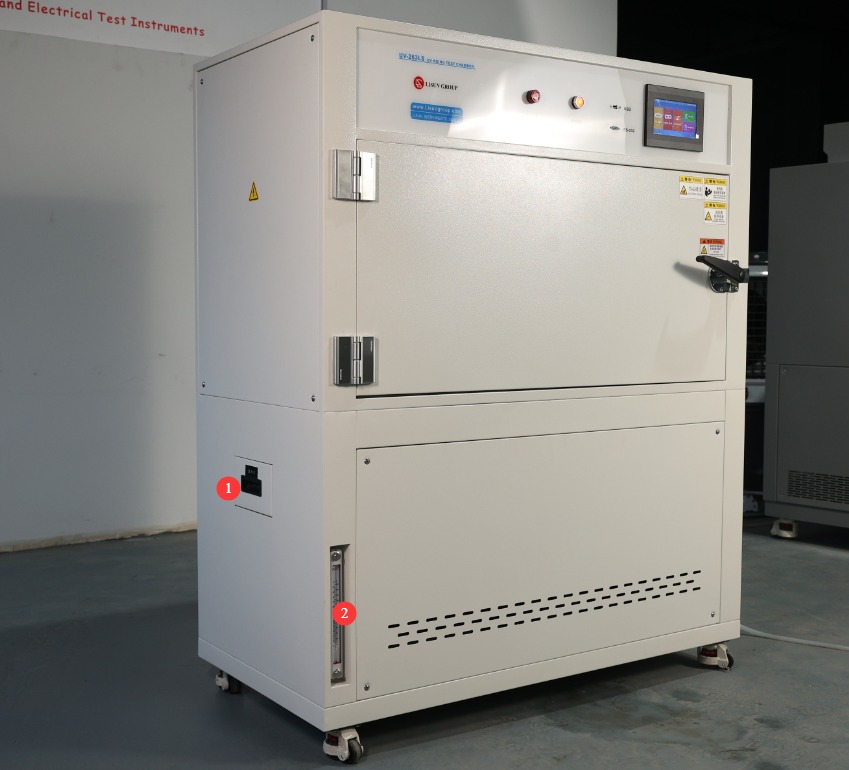
Рисунок 2
1.3.3 Внутри испытательной камеры
① Optical Fiber; ② UV lamp; ③ Blackboard temperature probe and test chamber temperature probe; ④ Sample rack.
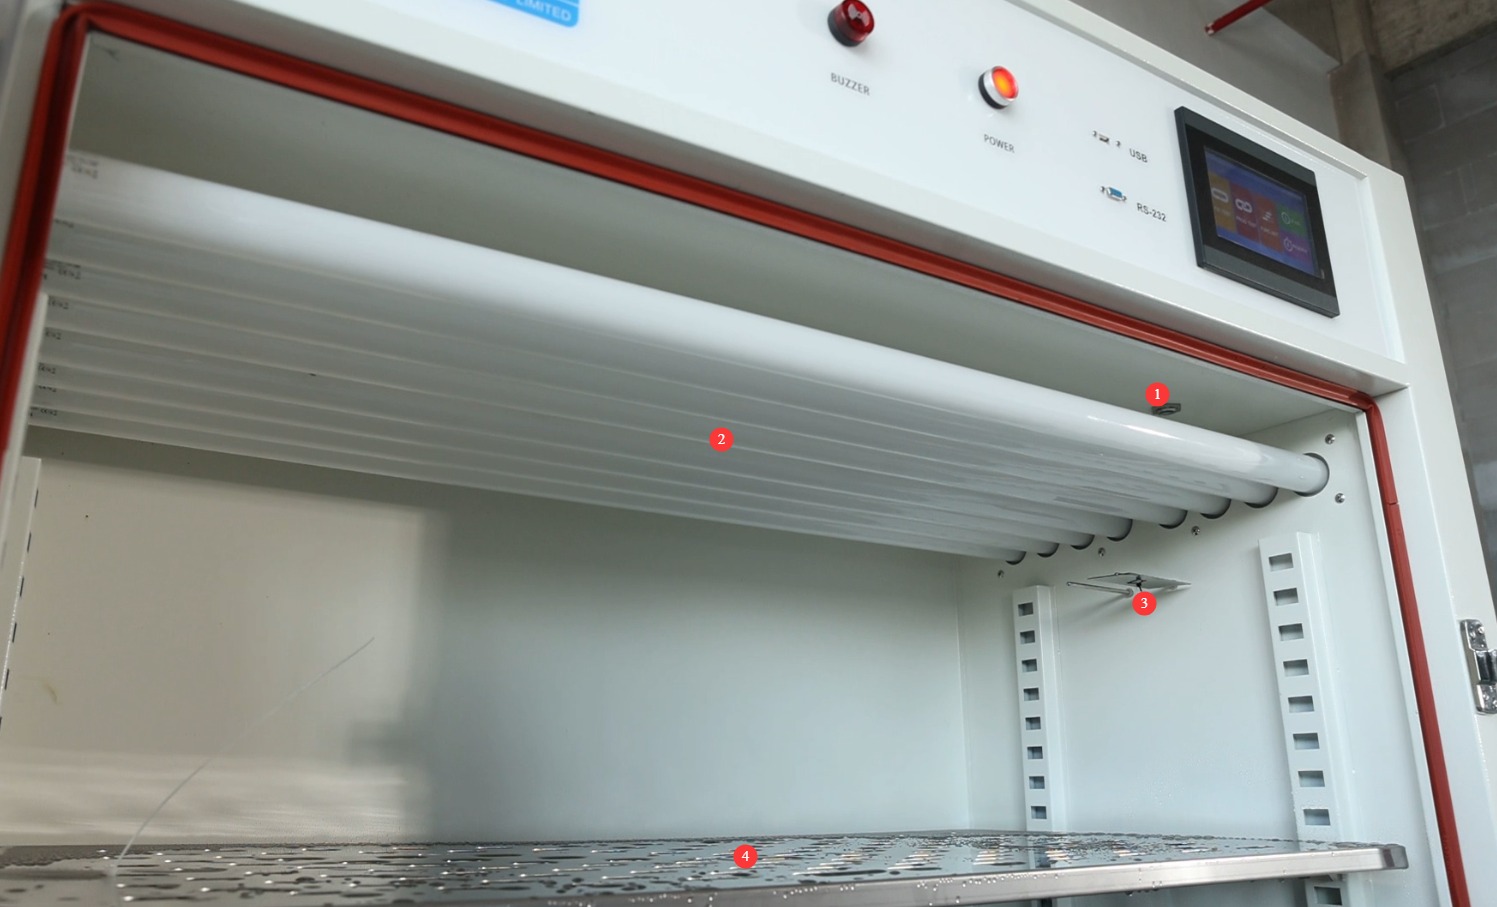
Рисунок 3
2. Меры предосторожности.
2.1 Электробезопасность
2.1.1 Подключение питания
Однофазное питание 220 В; розетки должны соответствовать стандартам безопасности, быть надлежащим образом заземлены и иметь номинальный ток, соответствующий номинальной мощности оборудования (рекомендуется установить отдельный автоматический выключатель).
2.1.2 Технические характеристики заземления
The equipment must be reliably grounded, with a grounding resistance of ≤50 Ω. Do not use gas pipes, non-metallic water pipes, or the neutral wire as a substitute for the ground wire. After grounding is complete, use a Grounding Resistance Tester to measure the grounding resistance. Power may only be applied after confirming that it meets the requirements, to prevent electric shock, equipment malfunctions, or measurement errors caused by poor grounding.
2.1.3 Противопоказания к проведению процедуры
Before wiring, inspecting, or maintaining the equipment, you must turn off the circuit breaker on the back of the equipment and disconnect the main power supply. Only proceed after confirming that there is no residual voltage;
Во избежание поражения электрическим током не следует нажимать на выключатель питания, сенсорный экран или кнопки приборов мокрыми руками;
Не размещайте внутри электрощита посторонние предметы (например, инструменты или бумагу), чтобы предотвратить короткое замыкание или повреждение компонентов из-за пыли или других посторонних предметов;
Не подключайте и не отключайте шнуры питания или сигнальные кабели во время работы оборудования, чтобы предотвратить короткие замыкания, которые могут повредить контроллер или электрические компоненты.
2.2 Эксплуатационная безопасность
2.2.1 Требования к испытательным образцам
Данное оборудование нельзя использовать для испытания легковоспламеняющихся, взрывоопасных, токсичных или высококоррозионных веществ (таких как спирт, бензин, сильные кислоты, сильные щелочи и т. д.). Поскольку оборудование не оборудовано взрывозащитными устройствами, такие вещества могут вызвать пожары, взрывы или коррозию оборудования;
The sample volume must not exceed 80% of the basket’s capacity, and the weight must not exceed the equipment’s specified load capacity (shelf load capacity ≤ 20 kg).
2.2.2 Эксплуатационная безопасность
Во время работы оборудования лицам, не являющимся специалистами, запрещается его разборка или ремонт. В случае неисправности следует обратиться к сотрудникам сервисной службы или эксплуатировать оборудование под руководством специалиста.
Do not open the chamber door during the test. The lamps emit intense ultraviolet radiation when in operation, which may cause severe sunburn or eye inflammation (similar to “snow blindness”);
Не устанавливайте температуру за пределами диапазона, указанного для оборудования;
When placing samples, distribute them evenly on the shelves; do not overcrowd them. Leave at least one-third of the space empty to ensure proper circulation of hot air inside the chamber and prevent localized temperature variations;
If the equipment triggers an alarm, immediately stop the test and troubleshoot the problem (see “Chapter 7: Troubleshooting and Resolution of Common Problems”). Do not force the equipment to restart; operating it before the problem is resolved may cause further damage to the equipment.
2.2.3 Запрещенное поведение
Не открывайте дверцу шкафа управления во время работы оборудования, чтобы избежать прикосновения к внутренним высоковольтным компонентам и поражения электрическим током;
Do not disassemble core components such as temperature sensors and heating elements without authorization. Modifying the equipment will void the warranty and may lead to safety incidents;
Do not place heavy objects (such as tools or accessories) on top of the equipment to avoid damaging the equipment panel or interfering with heat dissipation;
Не складывайте вокруг оборудования легковоспламеняющиеся предметы (например, картонные коробки, полиэтиленовую пленку и т. д.).
2.3. Экологическая безопасность
2.3.1 Требования к установке
The equipment must be installed in an air-conditioned room where the ambient temperature is maintained between 5°C and 25°C and the relative humidity is ≤85%. If the ambient humidity is high, condensation may form near the equipment door and test ports; in such cases, increase ventilation in the room or use a dehumidifier;
The installation site must be free of high concentrations of dust, corrosive gases (such as sulfur dioxide and chlorine), and flammable or explosive atmospheres. Direct sunlight must not shine on the equipment to prevent corrosion of the equipment housing and deterioration of electrical components;
Keep the device away from locations where ambient temperature fluctuates significantly, such as near vents or doorways, to prevent the device’s temperature control accuracy from being affected.
2.3.2 Требования к пространству
The distance between the equipment enclosure and the wall, as well as surrounding structures (such as other test equipment and shelving), must be at least 1500 mm to ensure unobstructed ventilation at the equipment’s heat vents (rear and sides);
Для обеспечения возможности открывания двери в любом направлении и облегчения размещения и извлечения образцов необходимо оставить зазор не менее 2000 мм у дверцы оборудования.
2.3.3 Горизонтальное размещение
The equipment must be placed on a level surface. Use a spirit level to ensure the equipment is level: Place the spirit level on the top surface of the equipment and confirm that the bubble is centered. Note: The following types of legs are adjustable to ensure the test chamber is level.
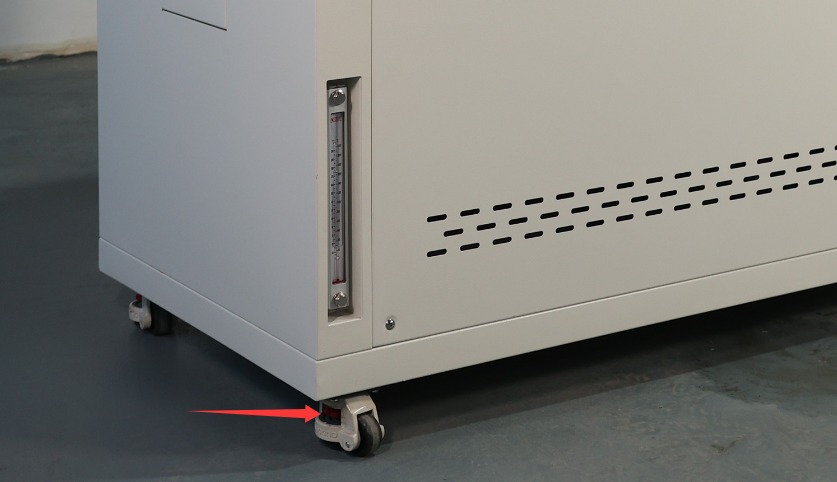
Рисунок 4
Наклон оборудования может привести к неравномерному распределению температуры внутри камеры и ухудшению герметичности двери, что может повлиять на результаты испытаний и срок службы оборудования.
Другие 2.4
По вопросам, не охваченным данным руководством, пожалуйста, проявляйте осторожность или свяжитесь с нами.
3. Подготовка к тесту
3.1 Заполнение резервуара для воды
Open the machine’s water drawer and check inside the drawer and the water tank (to check the water tank, you’ll need to open the bottom panel on the front of the machine) for any debris or standing water (clean the inside of the water tank before using the machine for the first time).
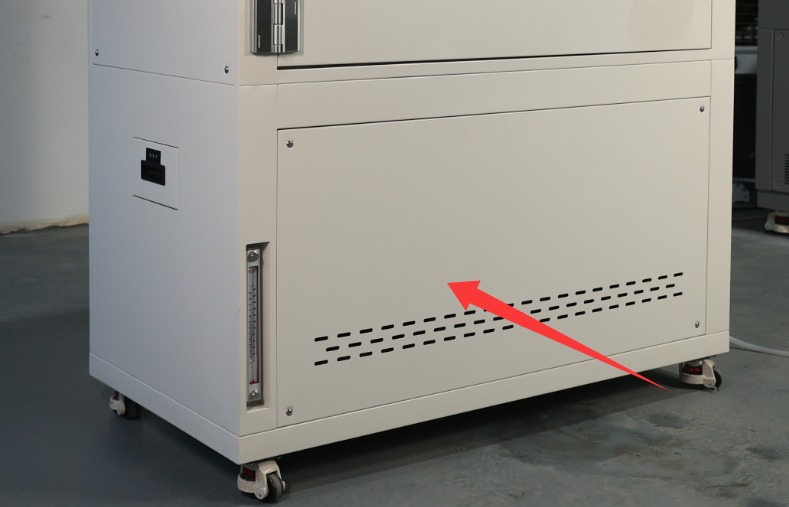
Рисунок 5
Before adding water, check whether the drain valve on the tank is in the “closed” position (the valve is closed when it is parallel to the tank body and open when it is perpendicular to it); if the drain valve is not closed, close it immediately to prevent water leakage from the tank;
The water tank must be filled with purified water (do not use tap water or bottled water, to prevent limescale from clogging the humidifier or corroding the water lines). When adding water, check the water level markings inside the tank until it reaches the maximum water level line on the viewing window (do not exceed this level to prevent overflow). Close the water tank drawer after adding water.
3.2 Starting Up the UV Aging Test Chamber
Verify that the external power supply and ground connections are secure, then close the main circuit breaker on the back of the equipment (flip it upward to the “ON” position).
Press the “Power” button on the control panel. After 5 seconds, the meter will automatically display the main screen.
After powering on, check the instrument for any alarm indications. If an alarm is present, first refer to Chapter 7 to troubleshoot; if no alarm is present, the instrument will enter standby mode, and you may proceed with parameter configuration.
3.3 Процедура размещения образцов
3.3.1 Размещение образцов
Open the test chamber door, adjust the height of the internal shelves, and place the test specimens evenly on the shelves: ① Do not cover the test chamber temperature display or the blackboard; ② Do not touch the interior walls of the chamber; ③ Avoid touching the UV lamp.
3.3.2 Закрытие дверцы шкафа
Gently push the cabinet door to ensure it is fully seated against the cabinet’s weatherstrip, with no gaps (if there are gaps, check to see if the door has sagged or if the weatherstrip has deteriorated; make minor adjustments to the door hinges or clean the weatherstrip).
После закрытия дверцы шкафа убедитесь, что защелка надежно зафиксирована, чтобы предотвратить неожиданное открытие дверцы во время работы.
4. Program Operation via the Touchscreen on The UV Aging Test Chamber
4.1 Introduction to the System Main Screen
① Тест с фиксированным значением; ② Программный тест; ③ Настройки работы; ④ Журнал неисправностей; ⑤ Запланированные настройки.
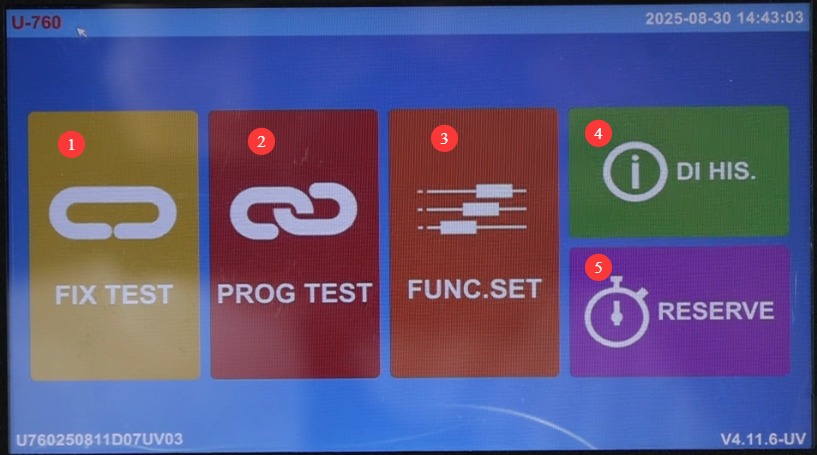
Рисунок 6
4.2 Калибровочный тест
4.2.1 Введение в экран проверки калибровки
Click “Constant-Value Test.” ① Test chamber temperature display; ② Test chamber temperature setting; ③ Black plate temperature display;④ Blackboard temperature setting; ⑤ UV irradiation intensity display; ⑥ UV irradiation intensity setting; ⑦ Control mode selection (three modes available: condensation, UV, and spray); ⑧ Parameter settings; ⑨ Test curve; ⑩ Start/Stop test.
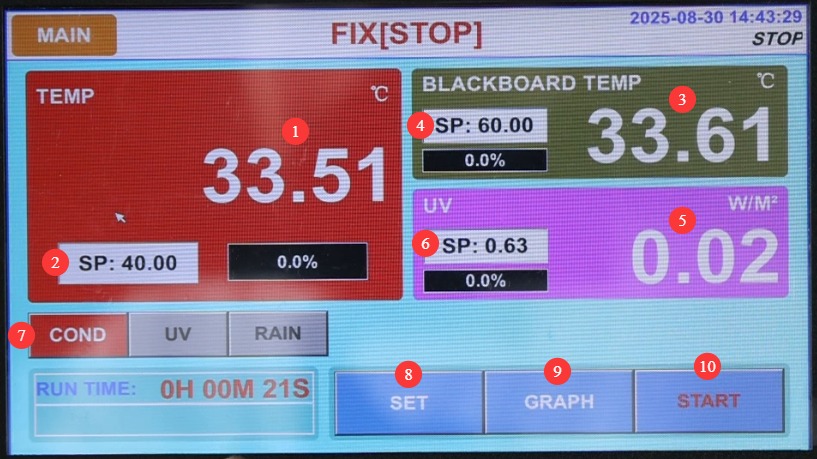
Рисунок 7
4.2.2 Introduction to the Fixed-Value Parameter Settings Screen
Click “Settings.” ① For long-duration tests, set this to “ON” to configure the test duration; set it to “OFF” to stop the test manually. ② Spray settings: You can set the system to continuous or cyclic spraying.
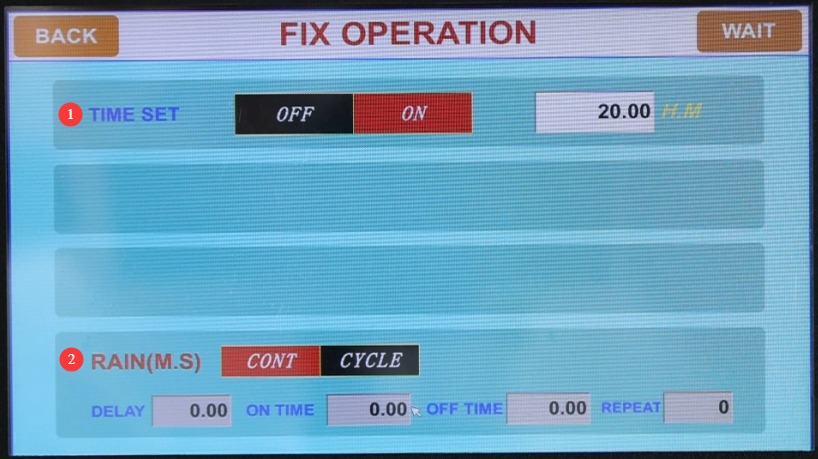
Рисунок 8
4.2.3 Fixed-Condition Test in Condensation Mode
① Select the condensation mode; ② Simply set the temperature of the test chamber; ③ Once the test begins, the black panel heating and UV irradiation functions will not be activated.
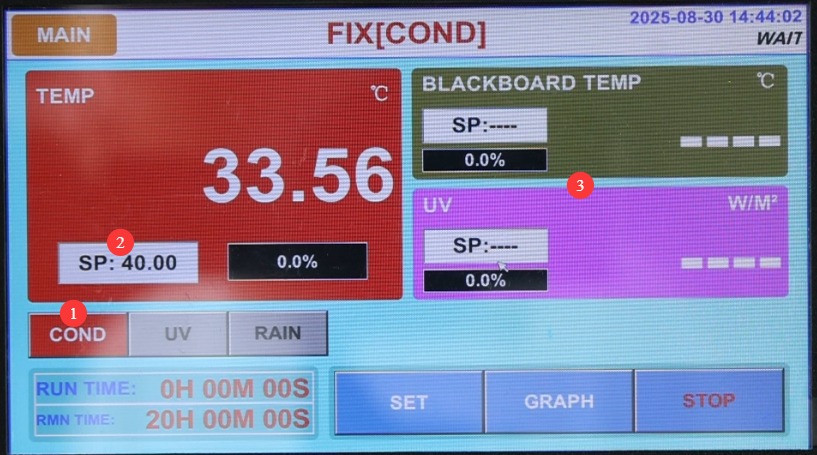
Рисунок 9
4.2.4 UV Mode Calibration Test
① Select UV mode; ② Set the test board temperature; ③ Set the UV light intensity.
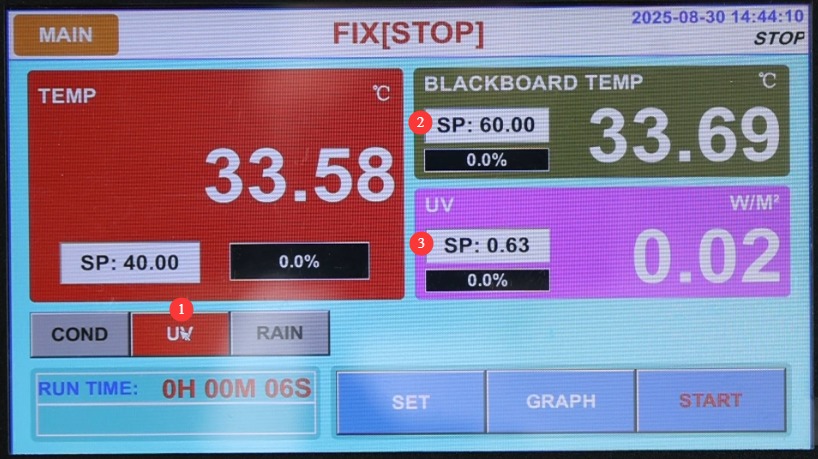
Рисунок 10
① Click “Start Test”; ② Once the test begins, the temperature inside the test chamber will not be displayed; simply monitor the temperature on the blackboard and the UV light intensity.
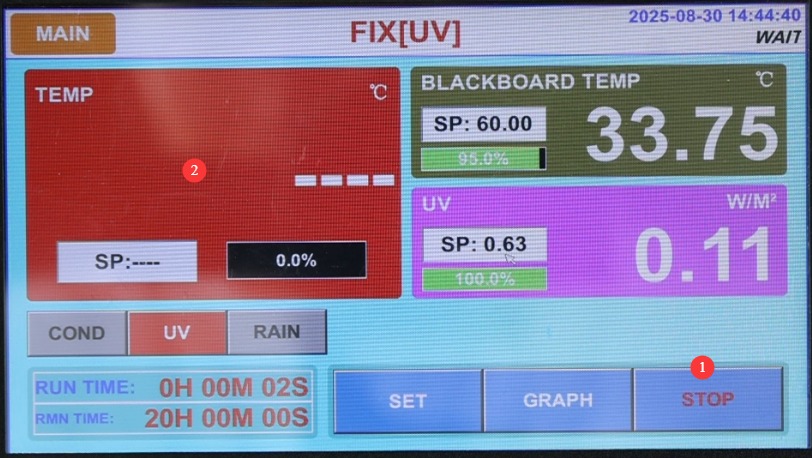
Рисунок 11
4.2.5 Spray Mode Calibration Test
When the spray mode is selected, after the test begins, the test chamber temperature, black panel temperature, and UV irradiation functions will not be activated; only the spray test will be conducted.
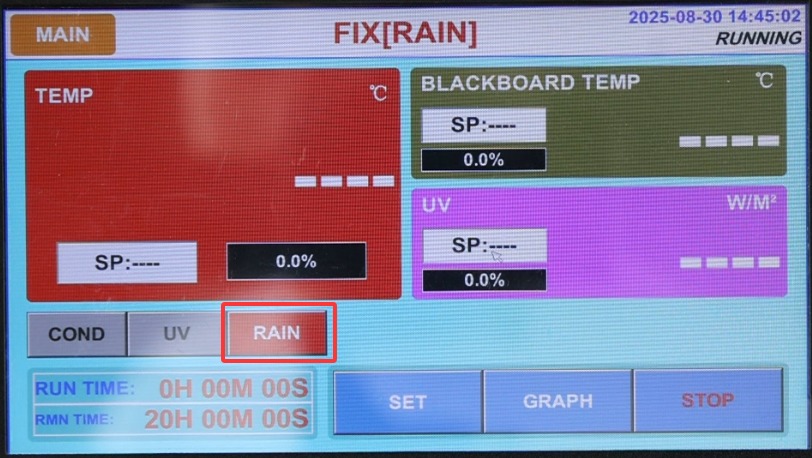
Рисунок 12
4.3 Тестирование программы
4.3.1 Введение в экран тестирования программы
Click “Program Test.” ① Select and display the program number currently being executed; ② Display the segment number currently being executed; ③ Edit the program.
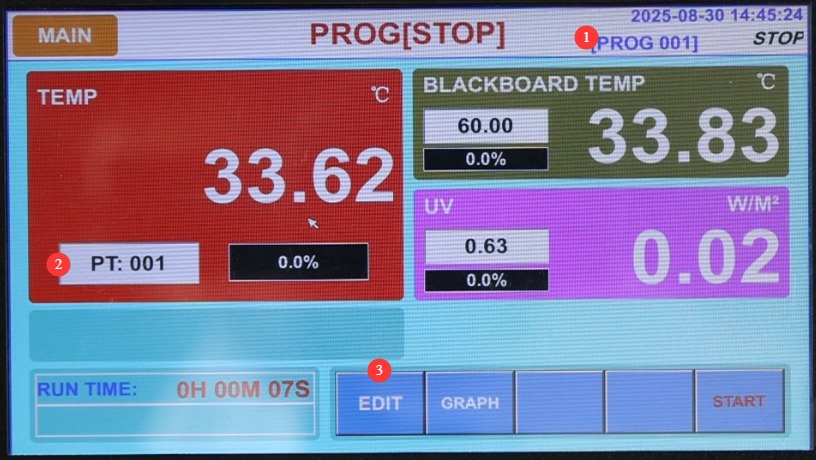
Рисунок 13
4.3.2 Введение в экран редактора программ
Click “Edit.” ① Enter the program number you want to edit; be sure to avoid duplicating existing program numbers. You can set up to 120 programs. ② Customize the program name. ③ Number of cycles; if no cycles are needed, enter 1.④ Link programs: If this program needs to automatically link to another program upon completion, enter the corresponding program number; otherwise, enter 0; ⑤ Switch to another test segment; ⑥ Set the test mode for this segment: condensation, UV, or spray;⑦ Test duration—set the duration for any test segments that are not required to -0.01; ⑧ Chamber temperature setting; ⑨ Black plate temperature setting; ⑩ UV irradiance setting; 11 Spray function switch—if this test segment involves spraying, set the spray function switch to ON.
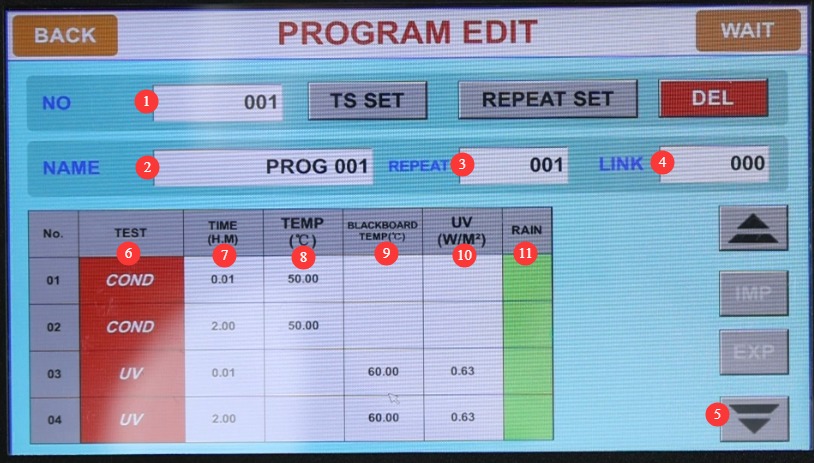
Рисунок 14
Note 1: If temperature or light intensity needs to be set for this test segment, the same parameters must be set for both segments. Segment 1 is the transition phase; set the test duration to 1 minute (the actual duration may exceed 1 minute), during which the test chamber will reach the required temperature or light intensity as quickly as possible. Segment 2 is the actual test phase; set the test duration to the required length. See the figure above.
4.3.3 Wait Function Settings
Нажмите кнопку «ОЖИДАТЬ» в правом верхнем углу.
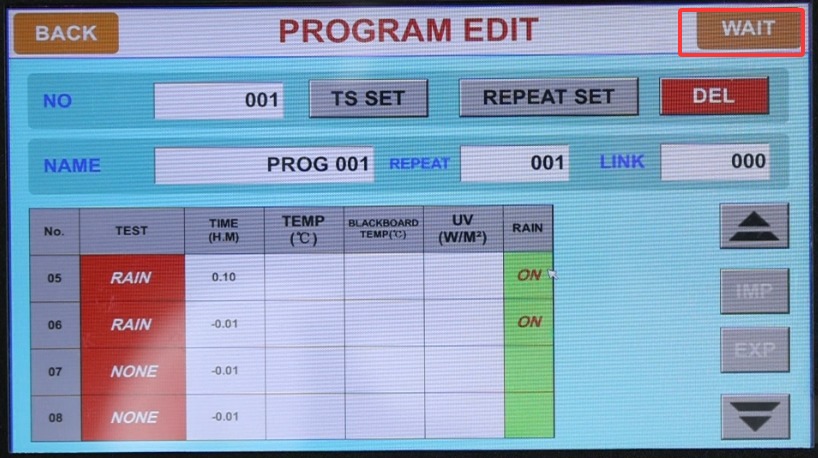
Рисунок 15
① The wait function must be enabled during program testing; ② Temperature wait range: If set to 2°C, the target temperature is considered achieved when the actual temperature differs from the target temperature by 2°C; ③ UV irradiance wait range: If set to 0.1, the target irradiance is considered achieved when the actual irradiance differs from the target irradiance by 0.1;④ Maximum wait time: If the target value is not reached within the maximum wait time, that segment will be skipped.
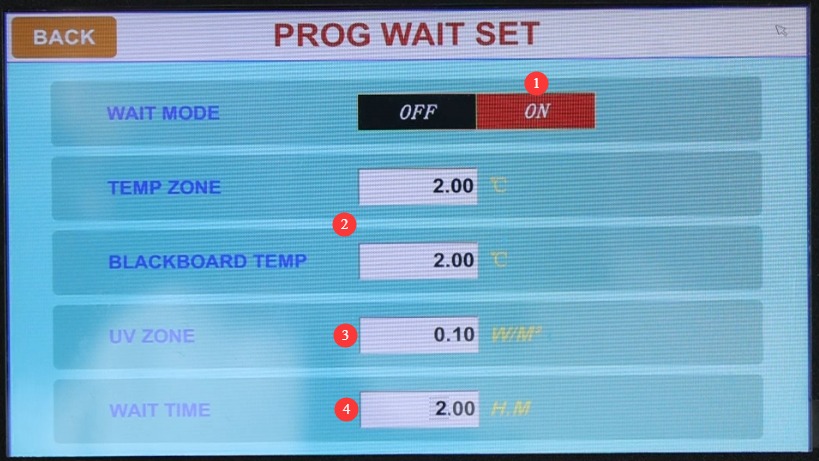
Рисунок 16
The wait function is primarily used during transition phases in the program; that is, once the test chamber reaches the set temperature and light intensity, it automatically skips the transition phase and proceeds to the next phase for the formal test.
4.3.4 Тестирование программы
① Нажмите «Старт»; ② Отображает номер текущей программы и номер сегмента; ③ «Удержание» позволяет программе продолжать выполнение текущего тестового сегмента, пока вы не нажмете кнопку отмены; ④ «Пропустить сегмент»: нажмите, чтобы пропустить текущий тестовый сегмент.
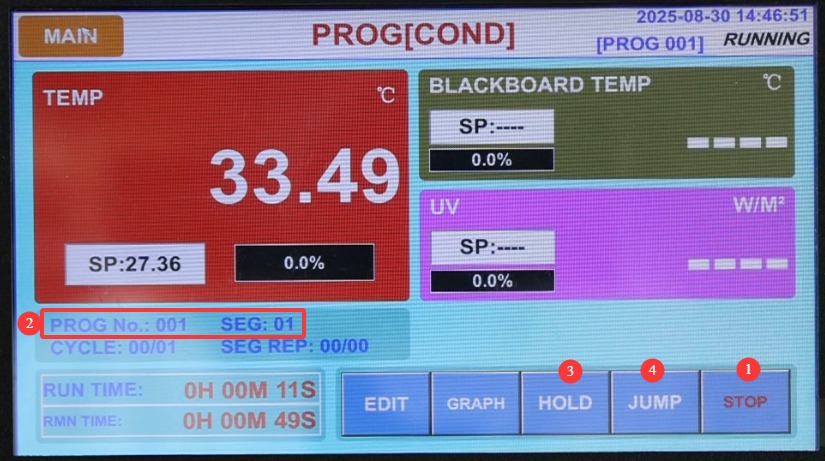
Рисунок 17
4.4 Введение в экран настроек работы
You can configure the display language and power-off restart mode (Stop: After a power outage during operation, the system returns to the “Stop” state when power is restored; Cold Start: After a power outage during operation, the system restarts from the first section and resumes operation when power is restored; Hot Start: After a power outage interrupts operation, the system continues from the section where it left off before the outage; when power is restored, the system returns to the state it was in before the outage) and other settings.
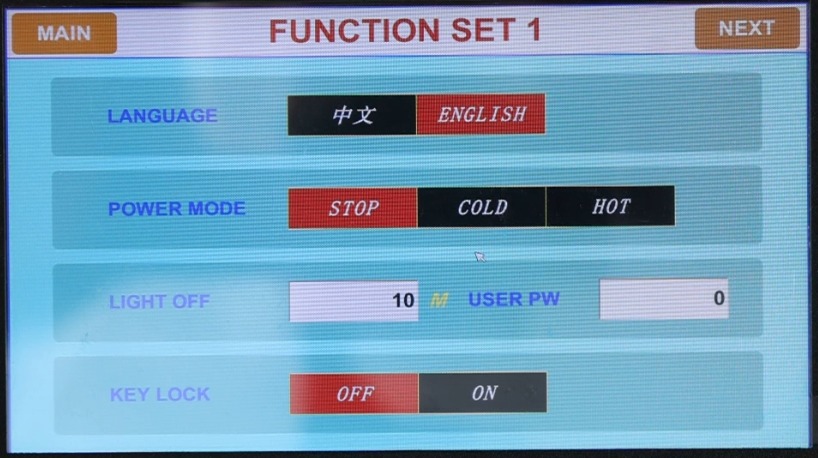
Рисунок 18
4.5 Introduction to the Fault Log Screen
Отобразить историю неисправностей.
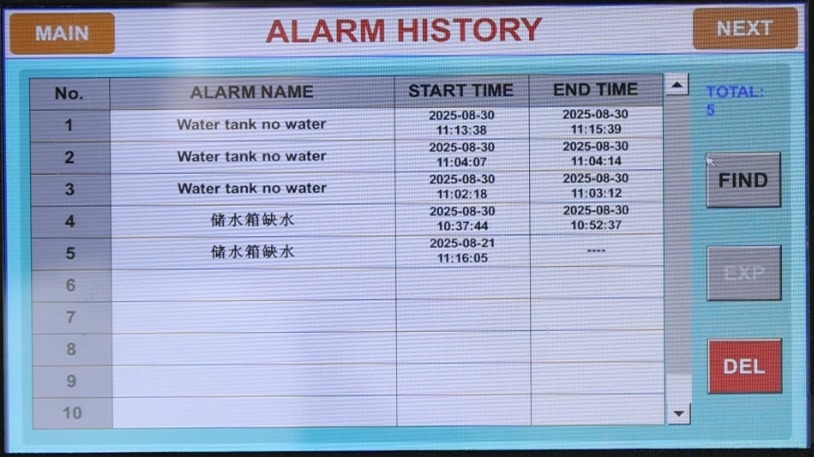
Рисунок 19
4.6 Введение в экран настроек записи на прием
① Set the system’s current time; ② Set the scheduled time; ③ Scheduled operation feature: Once enabled, the device will automatically run the currently selected test at the scheduled time.
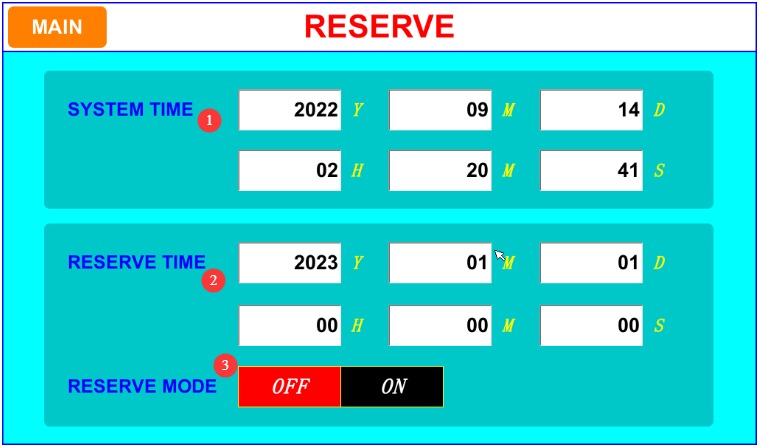
Рисунок 20
4.7 Monitoring the Test Operation Process
Keep an eye on the water level in the tank; during the condensation test, the water level will drop as water evaporates. Please refill the tank promptly when the water level drops.
5. Процедуры после испытаний
5.1 Завершение теста
Дождитесь завершения теста в обычном режиме; после этого устройство перейдет в режим ожидания. Если вам необходимо прервать тест досрочно, нажмите кнопку «Стоп» на соответствующем экране, и устройство перейдет в режим ожидания.
5.2 Извлечение и обработка образцов
Wear protective gloves, open the test chamber door, remove the sample, and place it in the designated area. Record any changes in the sample’s appearance (such as fading or cracking), and conduct subsequent analysis in accordance with the test standards.
Примечание: Не открывайте дверцу испытательной камеры, когда УФ-лампа включена.
5.3 Immediate Cleaning of Equipment
Протрите штатив для образцов и внутренние поверхности оборудования чистой тканью, чтобы удалить остатки пыли или мусора, оставшегося после обработки образцов.
Проверьте уровень воды в резервуаре. Если уровень воды низкий, долейте очищенную воду до стандартного уровня (чтобы резервуар был готов к следующему использованию).
If a spray test has been performed, open the drain valve to empty any remaining water from the tank, clean the tank, and then refill it with water.
5.4 Exporting and Saving Data
Verify that the USB flash drive is connected, go to the “Historical Data” or “Curves” screen, and select the test data or curves you want to export.
Click the “Export” button, wait for the export to finish, then safely remove the USB drive and back up the data to your computer.
Record key test information (such as program number, test duration, sample name, etc.) to facilitate subsequent traceability.
5. 5 Shutting Down the Equipment
If no further testing will be conducted that day, please turn off the test chamber and switch off the main circuit breaker on the back.
6. Ежедневное техническое обслуживание и уход за оборудованием.
6.1 Регулярная уборка
Очистка камеры: Очищайте камеру каждые 3–6 месяцев. После отключения электропитания снимите штатив для образцов и протрите штатив, дно поддона для воды и внутренние стенки камеры, чтобы удалить плавающие частицы и твердые примеси.
Tank Cleaning: Clean the tank once a month. Drain any accumulated water from the tank, then wipe down the inside walls with a clean cloth to remove scale and debris, preventing clogs in the nozzles or damage to the water pump.
Nozzle Cleaning: Inspect the nozzles once a week. If you notice uneven spraying or no water coming out, rinse the nozzles with clean water to remove any blockages (do not use hard objects to clear blockages).
Очистка сенсорного экрана: протрите его сухой чистой тканью, избегая попадания влаги в щели экрана.
6.2 Maintenance and Replacement of Light Tubes
Еженедельно осматривайте лампы накаливания. Если вы заметите трещины, изменение цвета или необычное мерцание, незамедлительно замените их.
Record the cumulative operating time of the lamp. When the irradiance drops significantly (below 80% of the set value), the lamp must be replaced even if it is not yet damaged.
When replacing the fluorescent tubes, remove the panels on both sides of the unit and unplug all the lamp sockets at both ends of the corresponding tubes, as shown in the figure below:
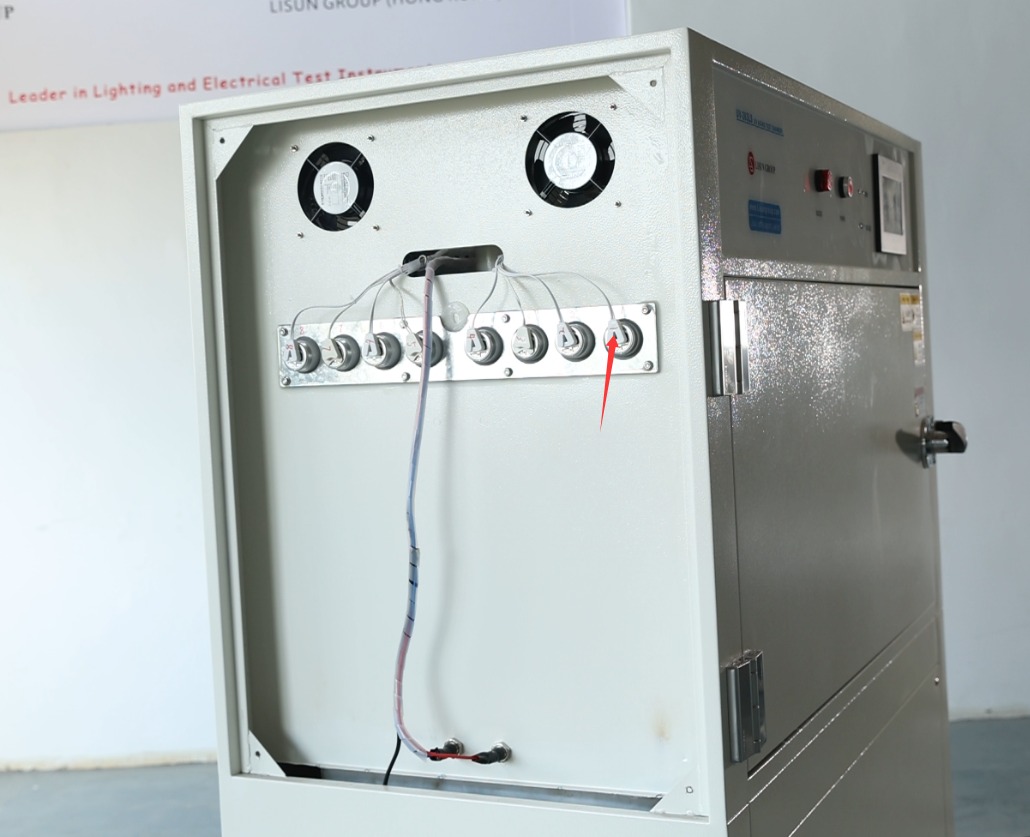
Рисунок 21
Затем, изнутри испытательной камеры, медленно поверните и вытащите люминесцентную лампу. Установите новую люминесцентную лампу, используя тот же метод.
6.3 Equipment Storage and Maintenance During Idle Periods
Short-term storage (within 1 month): Drain any water from the water tank and drip tray, clean the inside and outside of the equipment, disconnect the power supply, leave it in its original location, and ventilate the area regularly.
Длительный простой (более 1 месяца): В дополнение к указанным выше мерам, оборудование следует включать раз в месяц и оставлять работать не менее получаса, чтобы предотвратить износ электрических компонентов, таких как конденсаторы.
Before restarting: Check the power supply, piping, and the condition of the fluorescent tubes; clean the water tank and refill it with water; conduct a 30-minute test run to ensure there are no abnormalities before proceeding with the formal test.
7. Поиск и устранение распространенных проблем
7.1 Startup Failures
7.1.1 Symptoms: The device fails to start, and the power indicator light does not illuminate.
Возможные причины: неисправный внешний выключатель питания, сработавший автоматический выключатель или неплотно прилегающая вилка питания.
Solution: Check that the power plug is securely plugged in, and test the unit by plugging it into a different outlet; if the circuit breaker trips, check for a short circuit and then reset it; if the power switch is damaged, contact the manufacturer for repairs.
7.1.2 Symptom: The power indicator light is on, but the touchscreen does not respond
Возможные причины: ошибка калибровки сенсорного экрана, неисправность контроллера.
Solution: Disconnect the power supply for 3 minutes, then reconnect it; go to the second screen in the operation settings to calibrate the touchscreen; if calibration fails, contact the manufacturer to have the controller repaired.
7.2 Operational Failures
7.2.1 Fault Symptom: Temperature/Irradiance Does Not Reach the Set Value During Operation
Possible causes: Aging lamp tubes, heater malfunction, sensor malfunction, or ambient temperature outside the specified range.
Solution: Check the total operating time of the lamp and replace it if necessary; ensure the ambient temperature is between 5 and 27°C and that ventilation is adequate; if the sensor or heater is malfunctioning, contact the manufacturer for repairs.
7.2.2 Fault Symptom: An alarm is triggered during operation
Possible causes: Low water level in the tank, loose connection in the lamp tube, or parameter settings outside the specified range.
Troubleshooting: View the alarm log screen to identify the type of fault; if the water tank is low on water, refill it with purified water; if there is a loose connection with the lamp tube, unplug and replug it; if the parameters are out of range, enter the settings menu and adjust them to the appropriate range.
7.3 Sprinkler System Malfunction
7.3.1 Symptom: Insufficient spray pressure; water flow is too weak
Possible causes: The water pump pressure is not set correctly, the water level in the tank is too low, or the nozzle is clogged.
Решение: Поверните клапан регулировки давления над насосом по часовой стрелке, чтобы увеличить давление; долейте воду в бак до стандартного уровня; и прочистите форсунки от любых засоров.
7.3.2 Symptoms: The pump starts but no water is sprayed
Возможные причины: недостаток воды в насосе, засорение труб или полное засорение форсунки.
Solution: Disconnect the power supply and pour purified water into the pump’s inlet; check that the spray lines are clear; thoroughly clean or replace any clogged nozzles.
7.4 Сбои связи
7.4.1 Symptoms: The touchscreen displays “————,” and the data does not update.
Возможные причины: Плохое соединение между контроллером и платой управления; повреждение линий связи.
Решение: Отключите блок питания, проверьте, не ослаблены ли внутренние коммуникационные кабели, и подключите их обратно; если кабели повреждены, обратитесь к производителю для их замены.
7.5 Data Export Issues
7.5.1 Symptoms: Unable to export data or curves
Possible causes: The USB flash drive is not formatted, poor contact at the USB port, or insufficient storage space on the device.
Решение: отформатируйте USB-накопитель в FAT32, затем подключите его снова; попробуйте другой USB-накопитель; удалите некоторые старые данные, чтобы освободить место на диске.