
 Английский
 中文简体
中文简体 Русский
 Español
 Português
 Türkçe
 العربية
 Deutsch
 Polski
 Italiano
 Français
 한국어
한국어 ไทย
ไทย Tiếng Việt
 日本語
日本語





























Электрическое устройство для испытания на сжатие корпуса
Руководство пользователя
Применимый LISUN модели: LS-B21
1. Базовое понимание оборудования
1.1 Ключевые параметры
1.1.1 Технические характеристики оборудования
| Параметры | Внимание |
| Методы контроля | Touchscreen + PLC Control |
| Метод сжатия | Электрический |
| Значение силы сжатия | 50–1000 N, adjustable |
| Точность датчика | 1% полной шкалы |
| Compress Time | Adjustable from 1 to 99 minutes (seconds); once the compression time has elapsed, the system automatically releases pressure and retracts. |
| Разрешение смещения | 1 мм |
1.1.2 Применимые стандарты
The LS-B21 Electrical Casing Compression Test Device strictly complies with GB/T 17466.1-2019″Electrical Accessories—Installation Boxes and Enclosures for Fixed Electrical Installations for Household and Similar Purposes—Part 1: General Requirements,” specifically Clauses 15.3 and 15.5 (IEC 60670-1:2021 Clauses 15.2 and 15.5), and is used to conduct testing.
It is primarily used in electrical appliance quality inspection laboratories, quality control departments of manufacturers, third-party testing organizations, and for import and export product inspections.
1.2 Проверка конфигурации оборудования
1.2.1 Распаковка
При распаковке устройства обращайтесь с ним осторожно, чтобы не поцарапать корпус острыми предметами. После распаковки сначала осмотрите внешний вид устройства, чтобы убедиться в отсутствии видимых деформаций или вмятин, а также в том, что кнопки не повреждены и не расшатаны. Если вы обнаружите какие-либо неисправности устройства или его аксессуаров, не включайте его. Немедленно свяжитесь с нами.
1.2.2 Основной блок и принадлежности
| Номер регистрации | Внимание |
| ① | LS-B21 Compression Test Device Main Unit |
| ② | Шнур питания |
1.2.3 Загрузка электронных документов
We have already sent download links for the electronic user manual, calibration certificate, warranty card, and other documents via email at the time of shipment. Please download them promptly. If you missed the email, you may also contact us directly to request the download links again.
2. Меры предосторожности.
2.1 Электробезопасность
Before connecting the power cord, verify that the supply voltage is AC 220 V ± 10% and the frequency is 50 Hz or 60 Hz;
You must use a three-prong outlet with a protective ground, with a protective ground resistance of ≤4 Ω. Under no circumstances should you cut or disconnect the protective ground wire, as doing so poses a risk of electric shock.
2.2. Экологическая безопасность
Не использовать в средах с легковоспламеняющимися или взрывоопасными веществами, сильными электромагнитными помехами, высокими температурами и влажностью, а также при чрезмерном запылении;
Условия эксплуатации: температура от 5°C до 35°C, относительная влажность ≤ 65% RH.
2.3 Операционные процедуры
Improper operation can easily result in personal injury, equipment damage, and distorted test data; operators must thoroughly read this manual and strictly follow the procedures;
Перед процедурой снимите украшения, соберите длинные волосы в хвост и не надевайте свободную одежду;
Во время испытания необходимо принять меры предосторожности, чтобы предотвратить разлетание фрагментов образца и причинение ими травм;
During the test, do not extend your hands or tools into the fixture’s travel range to prevent crush injuries or accidents;
Operators must not leave their posts without authorization while the equipment is in operation; in the event of an abnormality, immediately shut off the power supply;
Не проводите испытания, превышающие допустимую нагрузку или предел хода, и не используйте поврежденные или нестандартные приспособления.
Другие 2.4
По вопросам, не охваченным данным руководством, пожалуйста, проявляйте осторожность или свяжитесь с нами.
3. Обзор оборудования
См. Рисунок 3-1.
| Номер регистрации | Внимание |
| ① | Power Cord Connection and Power Switch |
| ② | сенсорный экран |
| ③ | Положение образца при креплении |
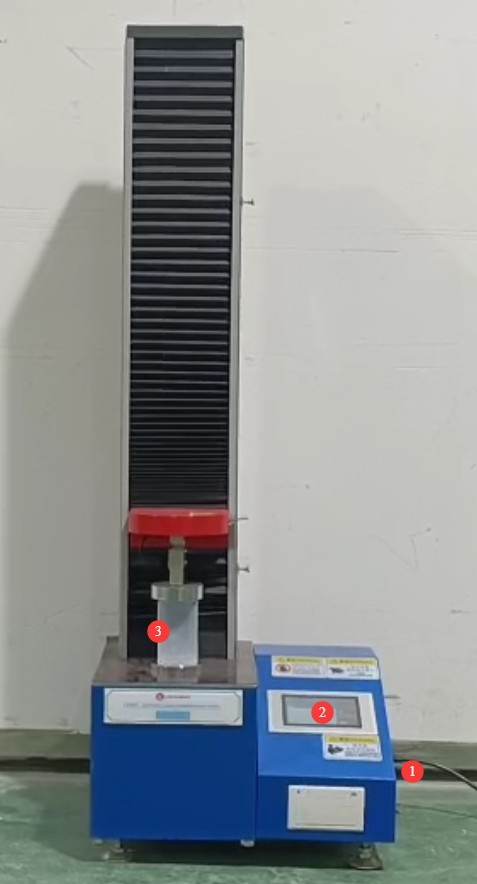
Рисунок 3-1
4. Введение в программу сенсорного экрана
4.1 Начальный экран
См. Рисунок 4-1.
| Номер регистрации | Внимание |
| ① | Display current force, displacement, deformation, and maximum force |
| ② | If necessary, enter the sample information. |
| ③ | Test Plan Setup |
| ④ | Display Settings: You can set the units for force values. |
| ⑤ | Curve Display Area |
| ⑥ | Up/Down buttons: Manually adjust the size of the specimen mounting position based on the sample size. |
| ⑦ | Click to clear the current test data |
| ⑧ | Click to return the ram to its initial position |
| ⑨ | Stop Test Button, Start Test Button |
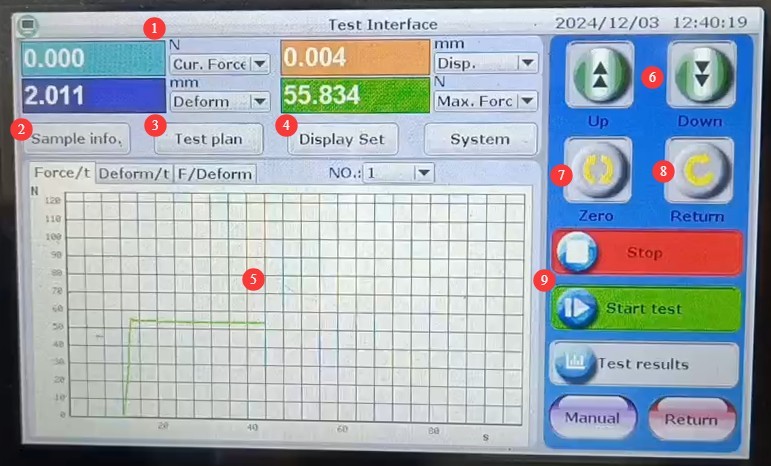
Рисунок 4-1
4.2 Test Plan Interface
См. Рисунок 4-2.
| Номер регистрации | Внимание |
| ① | To test the speed, you can use the default value. |
| ② | Break-induced shutdown: The machine automatically shuts down when the break reaches a set percentage. Optional feature |
| ③ | Test Type: The standard accessories included with this unit are intended for compression testing only. Please select “Compression.” |
| ④ | Start deformation calculation; calculation begins once the actual force reaches a specified percentage of the set force value. Optional setting |
| ⑤ | Shutdown conditions, optional pressure values. Optional settings |
| ⑥ | Start the crush test; once the actual force reaches a certain percentage of the set force, begin calculating the fracture ratio. Optional setting |
| ⑦ | Принудительные настройки |
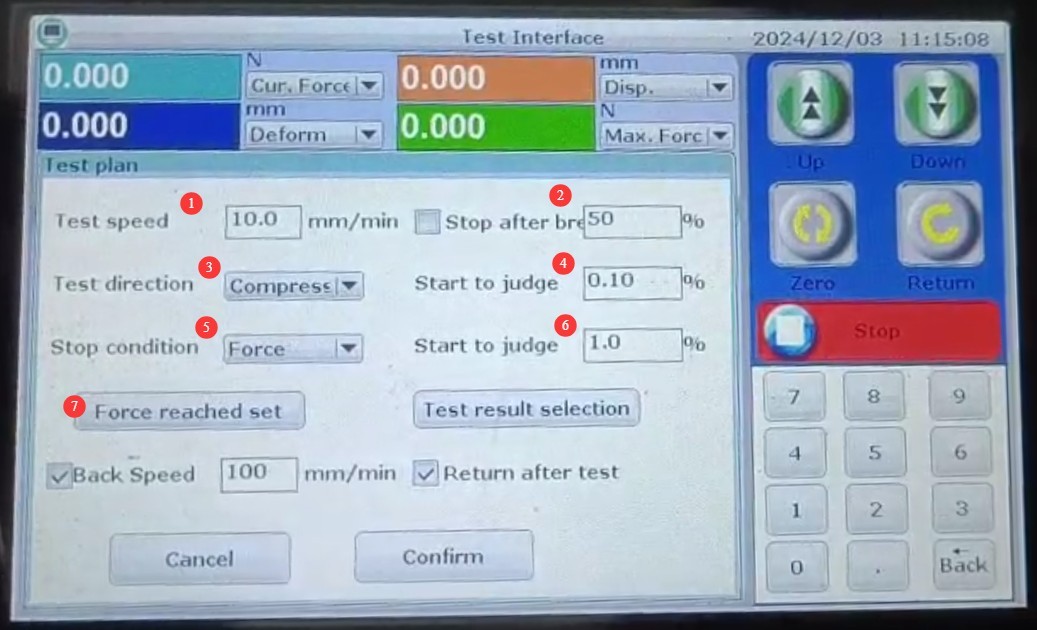
Рисунок 4-2
4.3 Force Value Settings Screen
См. Рисунок 4-3.
| Номер регистрации | Внимание |
| ① | Set the required force value |
| ② | Set the pressure duration |
| ③ | Speed reduction settings: When the pressure reaches a set percentage, the speed slows down. Use the default values. |
| ④ | Pressure-activated timing start setting: Timing begins when the actual pressure reaches 100% of the set pressure value. |
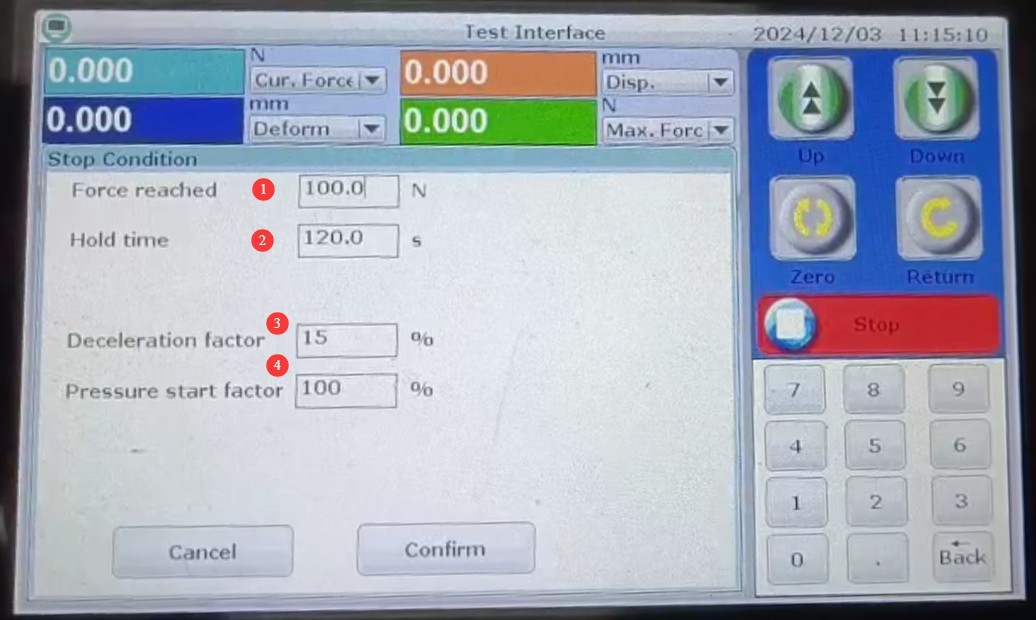
Рисунок 4-3
5. Процедура испытания на сжатие
5.1 Sample Preparation and Placement
Select a specimen of an electrical enclosure that is free of initial cracks, plastic deformation, and in perfect condition. Based on the specimen dimensions and in accordance with Section 4.1, use the up/down keys to adjust the platen to a position slightly higher than the specimen’s height, and place the specimen in the specimen mounting position as described in Chapter 3.
5.2 Настройки параметров тестирования
Set the compression force and duration in accordance with Section 4.3 and the relevant provisions of the standards.
Clause 15.3 of GB/T 17466.1-2019 (IEC 60670-1:2021 Clause 15.2) requires a force of 500 N applied for 1 minute; GB/T 17466.1-2019, Clause 15.5 (IEC 60670-1:2021, Clause 15.5) requires a force of 50 N/cm² (not exceeding 1000 N) to be applied through 9 mm thick plywood, with a duration of 1 minute.
5.3 Starting the Compression Test
| Номер регистрации | Внимание |
| ① | Click the “Start Test” button to begin the test |
| ② | Move the press block slowly toward the specimen and apply pressure. |
| ③ | When the actual pressure reaches the set value, the timer starts. |
| ④ | Once the force application time reaches the set duration, the test stops automatically and the load block returns to its original position. |
Note: If the actual pressure does not reach the set value, or if the specimen breaks during the compression process, you may click “Stop Test” to manually terminate the test.
5.4 Интерпретация результатов теста
After the test is completed, the mounting box and housing must not exhibit any deformation or damage that would affect continued use; if this is the case, the test is considered passed.
6. Ежедневное техническое обслуживание и уход за оборудованием.
6.1 Текущее обслуживание
After each test, clean up any dust or debris from the specimen mounting area to keep the work surface clean and free of debris; wipe down the equipment surface to keep it clean; verify that the clamping block is secure and that the limit stops are not misaligned; apply specialized lubricant to the drive screw to ensure smooth operation.
6.2 Технические характеристики хранения
6.2.1 Требования к условиям хранения
Температура: от 5°C до 35°C; относительная влажность: ≤65%; сухая, беспыльная среда, свободная от коррозионных газов.
6.2.2 Операции по долгосрочному хранению
Выключите питание и отсоедините все кабели; очистите оборудование и оберните его пылезащитной пленкой; включайте питание на 30 минут каждый месяц, чтобы предотвратить повреждение компонентов из-за влаги.
6.3 Требования к интервалу калибровки
Для обеспечения точности измерений и эксплуатационной надежности оборудования рекомендуется периодически отправлять его на калибровку в квалифицированную независимую метрологическую лабораторию. Рекомендуемый интервал калибровки составляет 12 месяцев. Конкретный интервал калибровки может быть определен пользователем в зависимости от частоты использования, условий окружающей среды и требований системы качества.
7. Поиск и устранение распространенных проблем
| Признаки неисправности | Возможные причины | Метод |
| The fixture does not raise or lower | Сработал концевой выключатель | Check and adjust the limit switches |
| Значения силы и перемещения отображаются некорректно. | Не сброшено до нуля | Нажмите, чтобы сбросить настройки и повторить попытку. |
| The machine stops as soon as the specimen is subjected to a load | Ошибка конфигурации параметров | See Section 4.2; do not set unnecessary parameters arbitrarily. |