
 Английский
 中文简体
中文简体 Русский
 Español
 Português
 Türkçe
 العربية
 Deutsch
 Polski
 Italiano
 Français
 한국어
한국어 ไทย
ไทย Tiếng Việt
 日本語
日本語





























Устройство для проверки нетвердых штифтов
Руководство пользователя
Применимый LISUN модели: LS-B04
1. Базовое понимание оборудования
1.1 Scope of Equipment Application
This device is suitable for specialized hardness testing of non-solid metal latches for household and similar uses.
Он используется в основном в лабораториях по контролю качества электротехнической продукции, отделах контроля качества производителей вилок, сторонних испытательных организациях, а также для проверки продукции, ввозимой в страну или вывозимой из нее.
1.2 Применимые стандарты
Strictly in accordance with Clause 14.2 and Figure 14 of GB/T 2099.1-2021 “Plugs and Sockets for Household and Similar Purposes—Part 1: General Requirements” (IEC 60884-1:2022, Clause 14.2, Figure 17), and testing has been conducted accordingly.
Conduct a static compression hardness test on hollow pins in accordance with the load, compression angle, and holding time specified in the standard. After testing, the pins shall show no cracks, no permanent deformation beyond the specified tolerance, and no indentations or dents that would affect normal use.
1.3 Принципы тестирования
1.3.1 Principles of Mechanical Pressurization
A gravity-loading mechanism is used to apply a standard, constant load perpendicular to the surface of the latch pin at the angle specified in Figure 14 of GB/T 2099.1-2021.
1.3.2 Принципы качественного тестирования
After the pressure-holding time specified in the standard has elapsed, observe the appearance of the pin, measure the amount of deformation and the dimensions of the indentation, and determine whether the pin meets the requirements for hardness and mechanical strength in accordance with national and international standards.
1.4 Загрузка электронных документов
Мы уже отправили ссылки для скачивания электронного руководства пользователя, сертификата калибровки, гарантийного талона и других документов по электронной почте во время отгрузки. Пожалуйста, скачайте их как можно скорее. Если вы не получили письмо, свяжитесь с нами, чтобы запросить ссылки для скачивания еще раз.
2. Меры предосторожности при использовании
2.1 Требования к безопасности рабочей среды
Рабочая температура окружающей среды: от 15°C до 35°C; относительная влажность: от 45% до 75%; отсутствие конденсации, коррозионных газов и пыли в воздухе.
Установите устройство на ровный, устойчивый верстак, оставив не менее 30 см рабочего пространства со всех сторон, и держите его подальше от источников вибрации.
2.2 Правила техники безопасности при выполнении производственных процедур
During testing, do not extend any body parts between the steel rod and the specimen holder to prevent crushing injuries.
Образцы должны быть надежно закреплены, чтобы предотвратить их падение или выпадение во время погрузки, что может представлять опасность для безопасности.
It is strictly prohibited to exceed the equipment’s rated load by adding weights without authorization or by forcibly pressing down on the loading mechanism, in order to prevent equipment damage and safety incidents.
3. Введение в настройку тестирования
См. Рисунок 3-1.
| Номер регистрации | Внимание |
| ① | Load weight, 100 N |
| ② | Steel rod, 4.8 mm in diameter |
| ③ | Sample holder; during testing, place the hollow pin sample between the holder and the steel rod |
| ④ | Handwheel for adjusting the height of the bracket |
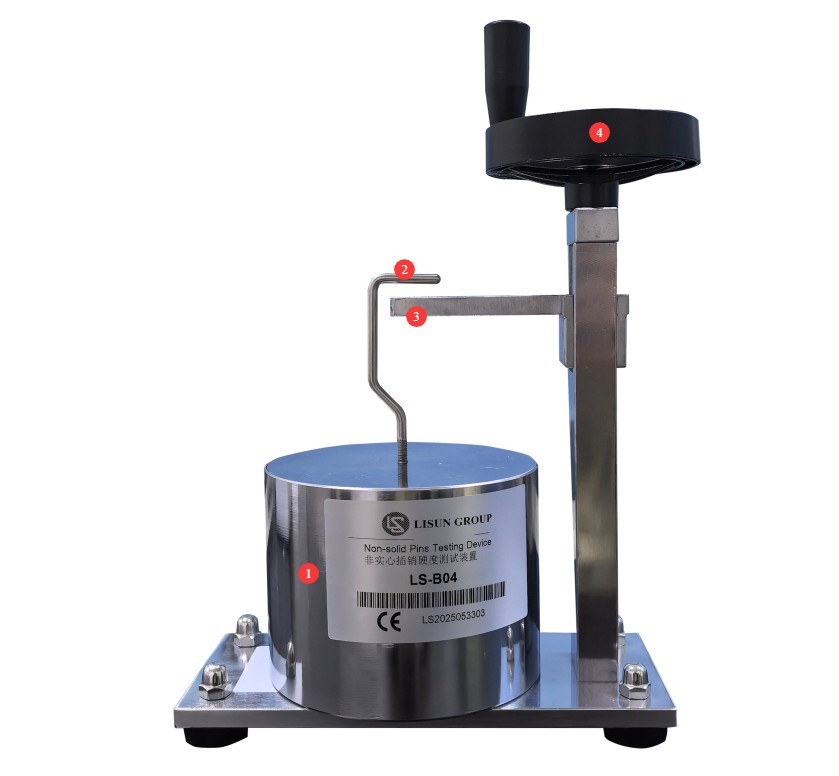
Рисунок 3-1
4. Hardness Testing of Hollow Pins
4.1 Предварительная обработка образцов
Select brand-new, unused, finished plugs and prongs that have not undergone any destructive testing, and exclude any nonconforming specimens with surface dents, cracks, or obvious deformation.
Allow the test sample to stand for 30 minutes in a standard environment with a temperature of 10°C to 35°C and a relative humidity of 45% to 75%, so that the sample temperature matches the ambient temperature and temperature differences do not affect the test results.
4.2 Specimen Clamping and Precise Alignment
Lower the stand, place the plug under test gently on the stand, and adjust the position of the weight and the orientation of the steel rod so that the axis of the steel rod is perpendicular to the axis of the plug. The center of the plug under test should be aligned and coincide with the vertical center of gravity axis of the weight, as shown in Figure 4-1 (image sourced from the IEC standard).
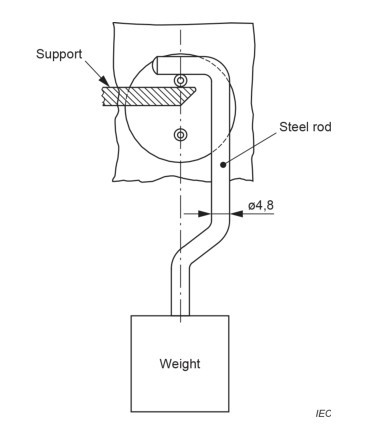
Рисунок 4-1
4.3 Pin Hardness Testing Procedure
Slowly raise the support so that the test pin comes into contact with the steel rod. Continue to slowly raise the support, and start the timer once the weight has completely left the base of the apparatus. Be careful to prevent the weight from swaying.
Monitor the equipment’s status throughout the entire pressure-holding period to ensure there are no unusual noises, no loosening of samples, and no misalignment between the steel rod and the pin. Do not touch any of the device’s adjustment components.
After 1 minute, the test is complete. Slowly lower the stand and carefully remove the test plug.
4.4 Интерпретация результатов теста
During the application of force, the reduction in dimensions at the point of force application on the latch shall not exceed 0.15 mm; after the steel rod is removed, the dimensional change of the latch in any direction shall not exceed 0.06 mm.
If both of the above conditions are met, the test passes; if either condition is not met, the test fails.
5. Процедуры после испытаний
5.1 Сброс устройства
Lower the stand to prevent force from being applied when the test is not in progress.
5.2 Подготовка проб
Разделите образцы, прошедшие и не прошедшие тест, четко их обозначьте и избегайте путаницы.
5.3 Уборка и наведение порядка на испытательном полигоне
Use a lint-free, soft cloth to wipe away dust and debris from the steel rods, brackets, and surfaces of the equipment. Do not rinse the equipment directly with water.
Разложите инструменты и гири на верстаке, аккуратно расставьте их и уберите весь мусор, образовавшийся во время эксперимента.
6. Плановое техническое обслуживание и уход
6.1 Регулярное обслуживание
Every three months, apply a small amount of neutral lubricating grease to key components, such as steel rods, brackets, and the shafts of the adjustment handwheels, to prevent rust and jamming.
6.2 Долгосрочное хранение и обслуживание
After routine maintenance is complete, cover the entire unit with a dust cover and store it in a dry, well-ventilated warehouse; apply rust-preventive oil to the weights and store them separately to prevent rust and deformation.
6.3 Требования к интервалу калибровки
Для обеспечения точности и надежности устройства рекомендуется периодически отправлять его на калибровку в квалифицированную независимую метрологическую лабораторию. Рекомендуемый интервал калибровки составляет 12 месяцев. Пользователи могут определить конкретный интервал калибровки в зависимости от частоты использования, условий окружающей среды и требований системы качества.
7. Поиск и устранение распространенных проблем
| Признаки неисправности | Возможные причины | Метод |
| The stand moves up and down jerkily | Dust buildup on the slide rail, insufficient lubrication, foreign objects lodged in the rail | Попробуйте еще раз, предварительно удалив пыль с направляющих, пополнив смазку и очистив зазоры от посторонних предметов. |
| Силовое смещение и наклон | The device is not level; the steel rod and the pin are not perpendicular; and the center of the pin does not align with the center of gravity of the weight. | Make sure the device is placed horizontally; refer to Section 4.2, readjust the position of the steel rod, pin, and weights, and try again. |