
 Английский
 中文简体
中文简体 Русский
 Español
 Português
 Türkçe
 العربية
 Deutsch
 Polski
 Italiano
 Français
 한국어
한국어 ไทย
ไทย Tiếng Việt
 日本語
日本語





























Водонепроницаемый струйный прибор
Руководство пользователя
Применимый LISUN модели: JL-56
1. Распаковка и базовое ознакомление с оборудованием.
1.1 Основные технические характеристики
| Параметры | Внимание |
| Измеримые уровни водостойкости | IPX5 и IPX6 |
| Standard Water Tank Sizes | 780 × 580 × 1100 мм (Д × Ш × В) |
| IPX5 | Nozzle diameter: 6.3 mm; water flow rate controlled at 12.5 ± 0.625 L/min |
| IPX6 | Nozzle diameter: 12.5 mm; water flow rate controlled at 100 ± 5 L/min |
| Максимальная грузоподъемность поворотного стола | 50 кг |
| Электропитание оборудования | Three-phase 380 V/50 Hz (60 Hz optional) |
Note: The turntable can be customized based on the maximum dimensions and weight of the test object.
Оборудование соответствует требованиям испытаний IPX5 и IPX6, указанным в GB/T 4208-2017, разделы 14.2.5–14.2.6 и рисунок 6.
1.2 Распаковка и проверка содержимого
1.2.1 Распаковка и визуальный осмотр
When unpacking the device, handle it gently to avoid scratching the exterior casing with sharp tools. After unpacking, first inspect the exterior of the device to ensure there is no obvious deformation or dents, and that the buttons are not damaged or loose. If you notice any abnormalities with the device or its accessories, do not turn it on. Please contact us immediately.
1.2.2 Main Unit and Major Components
| № | Внимание |
| ① | Water tank, including a touchscreen, flow control, inlet, and outlet |
| ② | Rotating turret; samples are placed on it, and it rotates automatically during testing. |
| ③ | Nozzle Holder for IPX5 and IPX6 Nozzles |
| ④ | Corrugated pipe, which can be used to connect inlet, outlet, and overflow ports |
| ⑤ | IPX5 Hose and Nozzle |
| ⑥ | IPX6 Hoses and Nozzles |
| ⑦ | Waterproof sockets and plugs; used to connect the turntable to the sample during electrical testing of the sample |
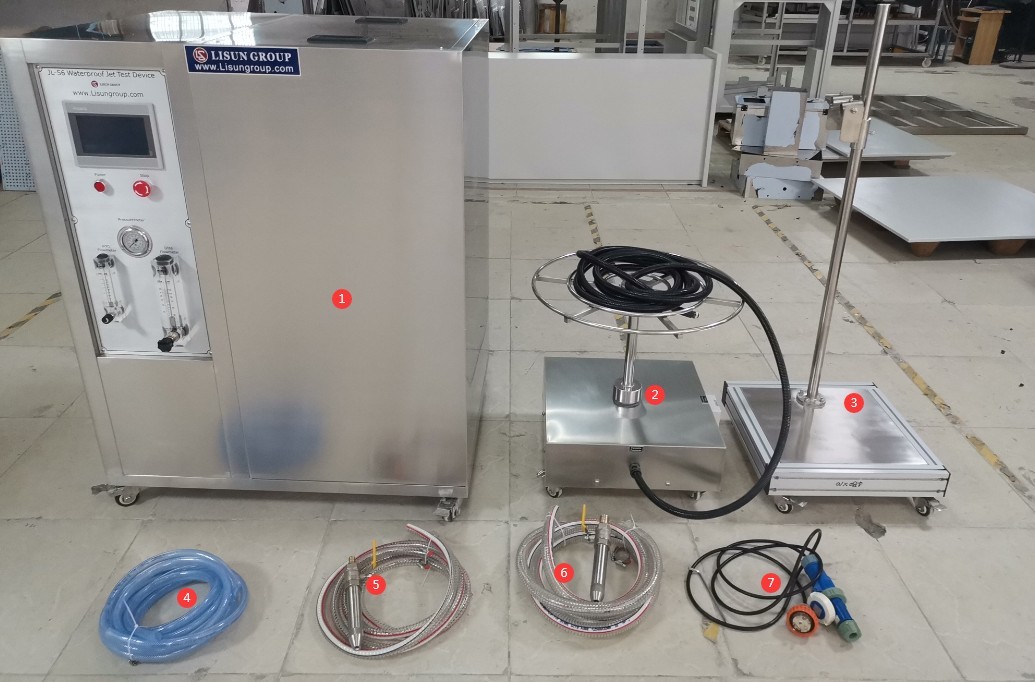
Рисунок 1
Ссылки для скачивания электронного руководства пользователя, программного обеспечения, гарантийного талона и других материалов были отправлены по электронной почте. Пожалуйста, скачайте их как можно скорее. Если вы пропустили письмо, пожалуйста, свяжитесь с нами, чтобы запросить ссылки для скачивания еще раз.
2. Меры предосторожности.
2.1 Электробезопасность
2.1.1 Технические характеристики подключения питания
Based on the nameplate, connect the equipment to the correct power source, typically 380V 50Hz (60Hz available upon request), and ensure the voltage and frequency are correct. Wire the equipment separately to avoid sharing a circuit with other high-power devices. Verify that all connections are secure and free of looseness.
2.1.2 Требования к заземлению
The equipment must be reliably grounded, with a grounding resistance of ≤4 Ω. Do not use gas lines, non-metallic water pipes, or neutral wires as substitutes for the grounding wire. After grounding is complete, use a Grounding Resistance Tester to measure the grounding resistance. Power may only be applied after confirming that it meets the requirements, to prevent electric shock, equipment malfunctions, or measurement errors caused by poor grounding.
2.1.3 Electrical Operation Precautions
Before wiring, inspecting, or maintaining equipment, the main power supply must be disconnected, and operations should not begin until it has been confirmed that there is no residual voltage;
Во избежание поражения электрическим током не следует нажимать на выключатель питания, сенсорный экран или кнопки приборов мокрыми руками;
Do not place any foreign objects (such as tools or paper) inside the electrical control cabinet to prevent short circuits or component damage caused by dust or foreign objects;
Не подключайте и не отключайте шнуры питания или сигнальные кабели во время работы оборудования, чтобы предотвратить короткие замыкания, которые могут повредить контроллер или электрические компоненты.
2.2 Эксплуатационная безопасность
Before testing, securely fasten the sample to the center of the turntable to prevent the impact of the water spray from dislodging or displacing the sample; when conducting powered tests on the sample, ensure that the sample’s wiring is secure and that there is no risk of short circuits or electrical leakage;
The IPX6 test involves high water flow and strong water pressure. Before testing, ensure the water tank is full and that the spray gun is secured to the mount; do not conduct the test by holding the spray gun in your hand;
Do not place any objects within the equipment’s operating area. Do not enter the spray zone while the equipment is in operation to avoid being struck by a strong jet of water;
In the event of a malfunction, non-professionals are prohibited from disassembling or repairing the equipment; please contact us or follow the instructions of a technician;
If the touchscreen displays an alarm, immediately stop the test and troubleshoot the problem. Do not force the device to restart (to prevent further damage).
2.3. Экологическая безопасность
The distance between the equipment and walls, as well as surrounding structures (such as other test equipment and shelving), must be at least 1500 mm to facilitate operation and maintenance;
The water tank, nozzle bracket, and turntable must be placed on a solid, level surface. Use a level to ensure they are level, making sure the bubble in the level is centered. Note: The equipment’s feet are adjustable to achieve a level position.
Другие 2.4
По вопросам, не охваченным данным руководством, пожалуйста, проявляйте осторожность или свяжитесь с нами.
3. Обзор оборудования и сборка
3.1 Резервуар для воды
3.1.1 Front View of the Water Tank
| № | Внимание |
| ① | сенсорный экран |
| ② | Выключатель |
| ③ | Экстренная остановка |
| ④ | Датчик давления воды |
| ⑤ | IPX5 Water Flow Regulation and Flow Meter |
| ⑥ | IPX6 Water Flow Regulation and Flow Meter |
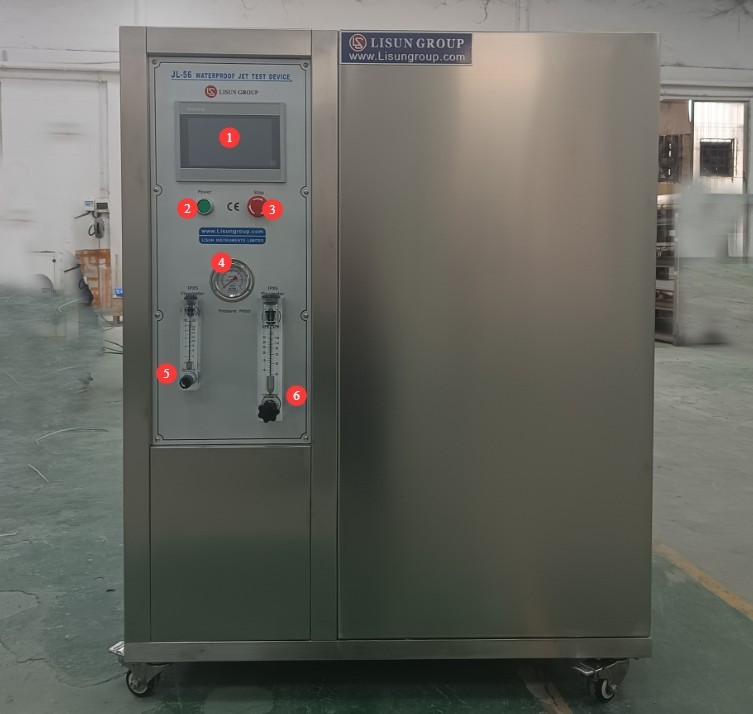
Рисунок 2
3.1.2 Back of the Water Tank
| № | Внимание |
| ① Вход | This unit can be connected to a clean tap water faucet; simply keep the inlet valve and faucet handle open at all times. The water tank contains a float valve that automatically controls the opening and closing of the inlet. Note : Before using the unit for the first time, please rinse the inside of the water tank with clean water. If debris enters the pump, it may affect the pump’s performance or even damage it. |
| ② Overflow outlet | If the float valve inside the inlet malfunctions and the water level continues to rise, water will flow out through the overflow outlet. |
| ③ Автоматический выключатель | |
| ④ Please connect the turntable cable to this port. | |
| ⑤ Main Power Cord | Пожалуйста, подключите устройство к соответствующему источнику питания в соответствии с информацией, указанной на паспортной табличке. |
| ⑥ Sample Power Cord | Please connect the device to an appropriate power source based on the sample being tested. Note: Abnormal conditions, such as short circuits, may occur in the sample during testing; you may connect an external ground-fault circuit interrupter (GFCI) here. |
| ⑦IPX6 Water Outlet | Connect the IPX6 hose |
| ⑧IPX5 Water Outlet | Connect the IPX5 hose |
| ⑨ Drain | If the water tank has not been used for an extended period, or if you need to replace or drain the water inside, turn off the water supply faucet, open the drain valve, and drain the water. |
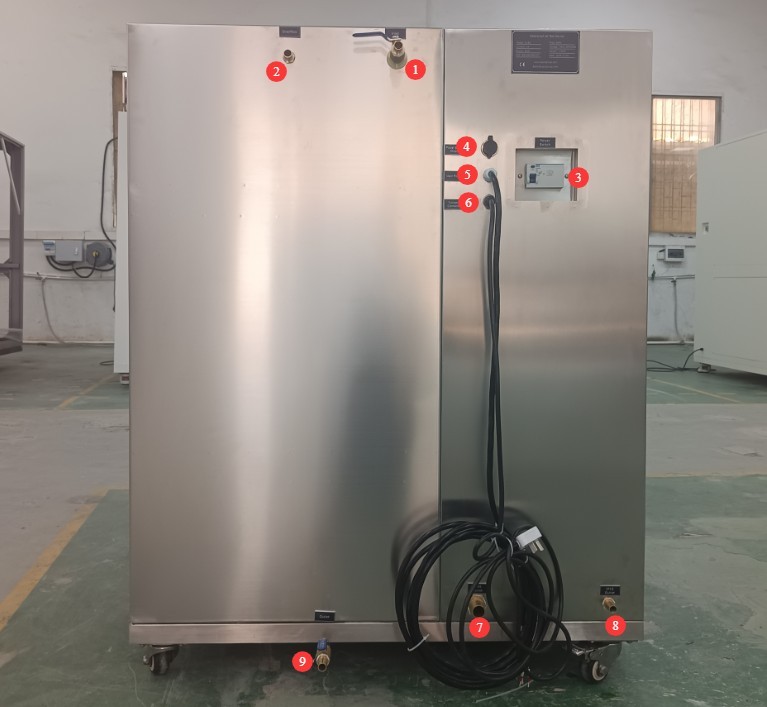
Рисунок 3
3.1.3 Inside the Water Tank
| № | Внимание |
| ① Mechanical Float Device | When the water tank is low on water, the float drops, and the inlet automatically opens; when the water tank is full, the float rises, and the inlet automatically closes. |
| ② Electronic Float Device | If the water level in the tank is too low and the electronic float drops, a low-water alarm will appear on the touchscreen. |
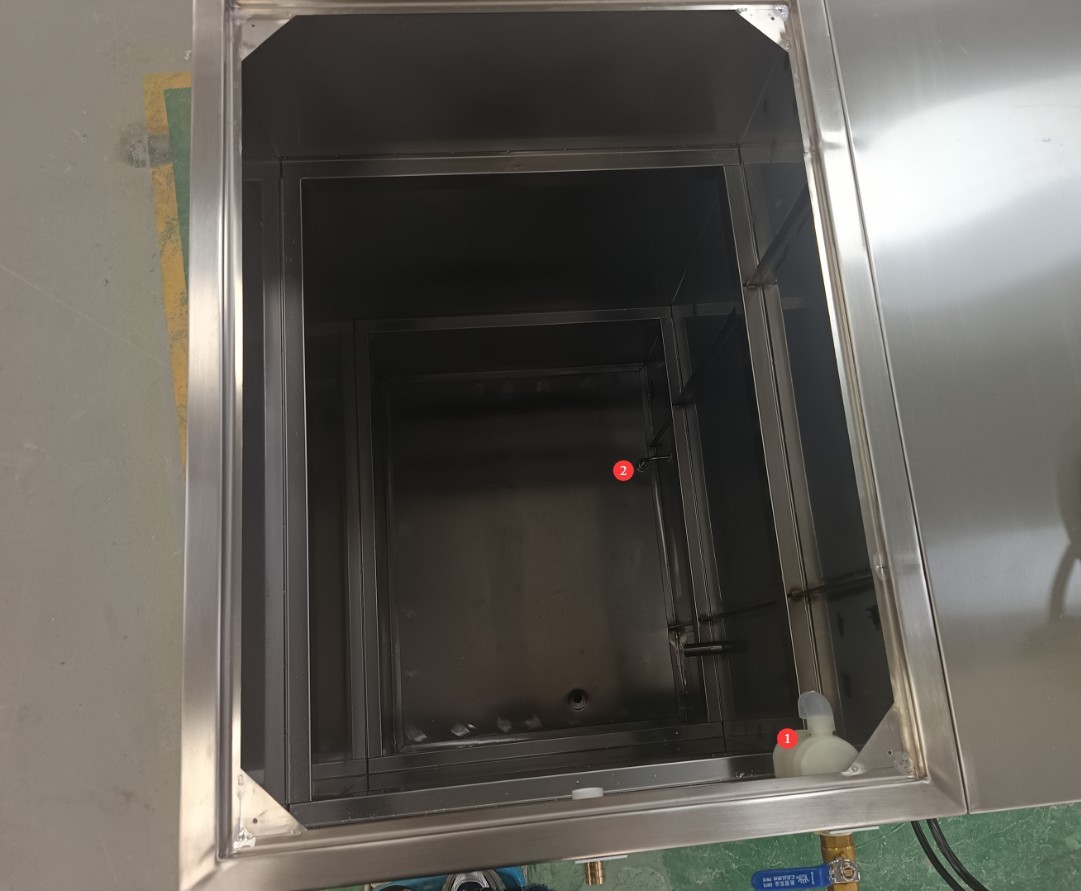
Рисунок 4
3.2 Nozzle Bracket
Attach the IPX5 and IPX6 nozzles to the bracket; the height and angle of the nozzles are adjustable.
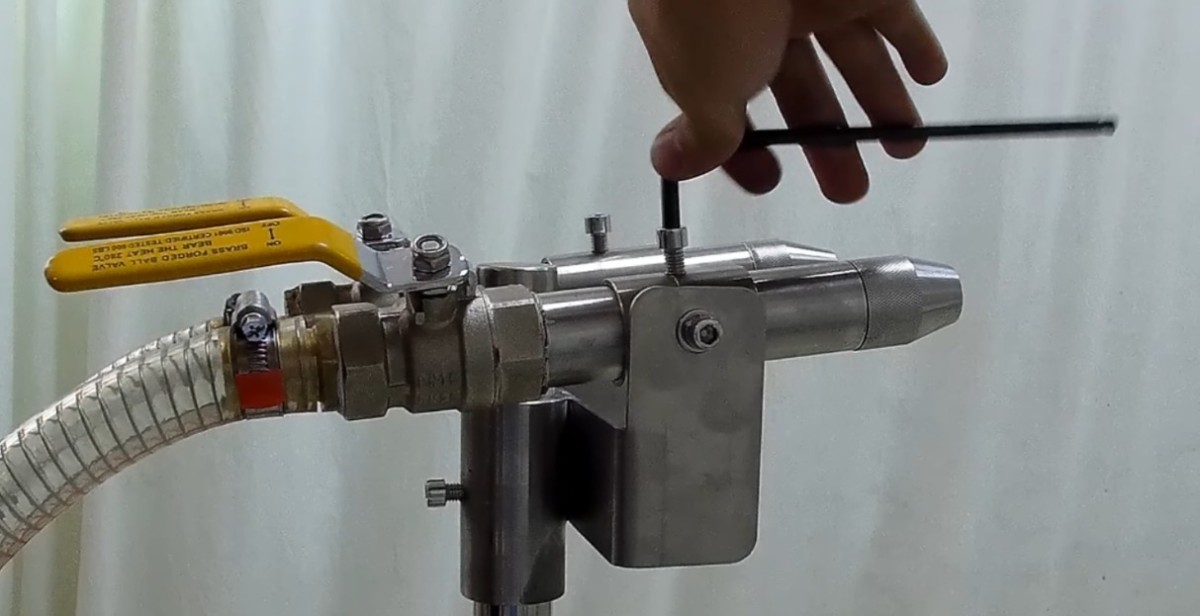
Рисунок 5
Note: During the test, hold the nozzle bracket with one hand to control the direction of the nozzle and prevent the bracket from tipping over due to impact.
3.3 поворотный стол
The test distance for IPX5 and IPX6 is 2.5 to 3 meters. Please position the nozzle bracket and turntable appropriately to ensure the test distance meets the standard requirements. The height of the turntable is adjustable.
If the sample requires testing under power, please use a waterproof plug and socket to connect the turntable to the sample.
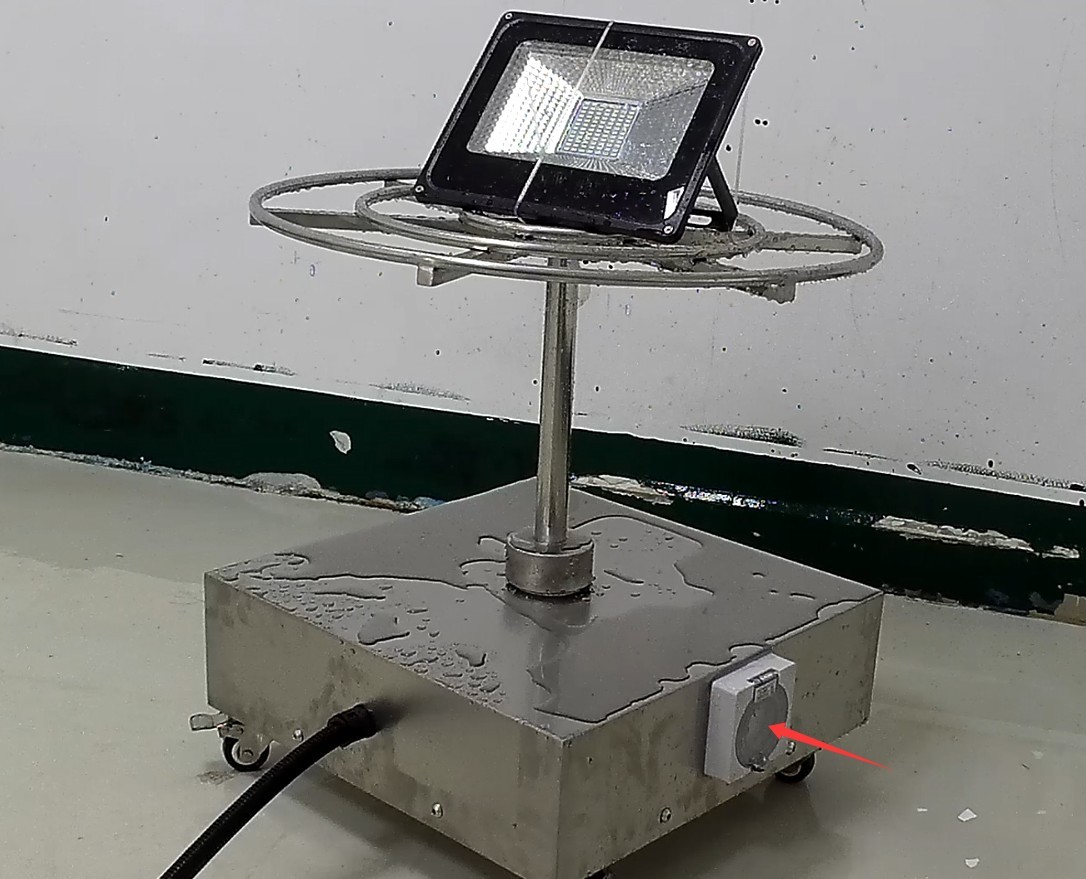
Рисунок 6
3.4 Включение
After verifying that all connections are correct, turn on the device’s circuit breaker, then press the green power switch to turn on the device.
4. Введение в программу сенсорного экрана
4.1 Компоненты основного интерфейса программы
4.1.1 Пользовательский интерфейс
| № | Внимание |
| ① Степень водостойкости: IPX5 | Once selected, you can configure the IPX5 test parameters and perform the IPX5 water spray test. |
| ② Степень водостойкости: IPX6 | Once selected, you can configure the IPX6 test parameters and perform the IPX6 water spray test. |
| ③ Пример источника питания | Питание образца можно включать и выключать. При включении питания образца для тестирования программа будет автоматически подавать питание на образец в соответствии с временем включения/выключения, заданным в интерфейсе настроек параметров. |
| ④ Параметры тестирования | Нажмите, чтобы перейти к экрану настроек параметров теста. |
| ⑤ Заводские настройки | При нормальной работе оборудования нет необходимости входить в режим отладки. Если параметры тестирования оборудования отклоняются от нормы, вы можете войти в режим отладки. Для этого потребуется пароль; пожалуйста, свяжитесь с нами. |
| ⑥ Manual Window | Перед официальным тестированием вы можете проверить, правильно ли работают все функции устройства, в окне руководства пользователя. |
| ⑦ Reset to Zero | Перед началом теста нажмите здесь, чтобы очистить данные предыдущего теста. |
| ⑧ Start the Test | Click to start the water spray test |
| ⑨ Test Stopped | Click to stop the water spray test |
| ⑩ Test Duration Display | Отобразить текущую продолжительность теста |
| ⑪ Sample energization time | Отобразить текущую продолжительность включения питания для данного образца. |
| ⑫ Sample power-off time | Отобразить продолжительность отключения электроэнергии для текущего образца. |
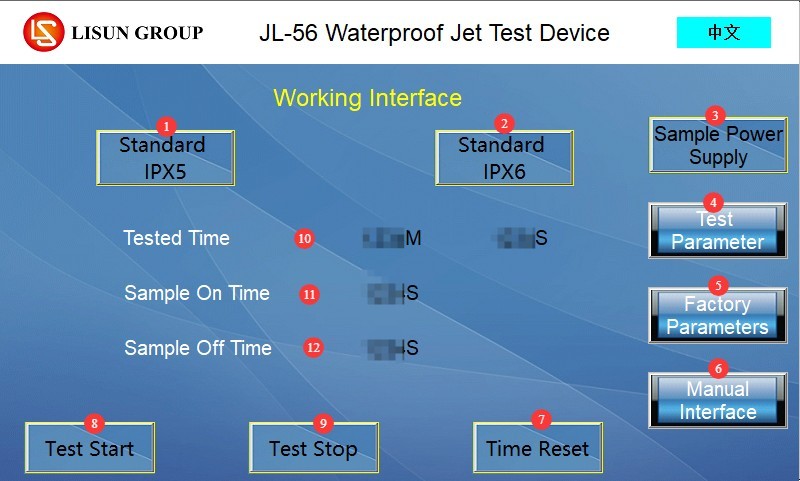
Рисунок 7
4.1.2 Интерфейс настройки параметров
| № | Внимание |
| ① Продолжительность теста | The total test duration can be set; the GB/T 4208-2017 standard requires that the test duration for both IPX5 and IPX6 be ≥3 min. |
| ② Скорость вращения поворотного стола | 1–5 r/min; the factory default turntable speed is 1 r/min. If the sample is large or has a large surface area, the speed may be adjusted appropriately to 2–5 r/min . Note: For samples that require power during testing, the turntable will automatically rotate in both directions to prevent the sample’s power cord from becoming tangled. |
| ③ Время, в течение которого образец подвергается воздействию энергии | Set the duration of continuous power supply to the sample during the test, in seconds |
| ④ Power-off time of the sample | Set the duration of continuous power interruption for the sample during the test, in seconds |
| ⑤Back | Нажмите, чтобы вернуться к рабочему интерфейсу. |
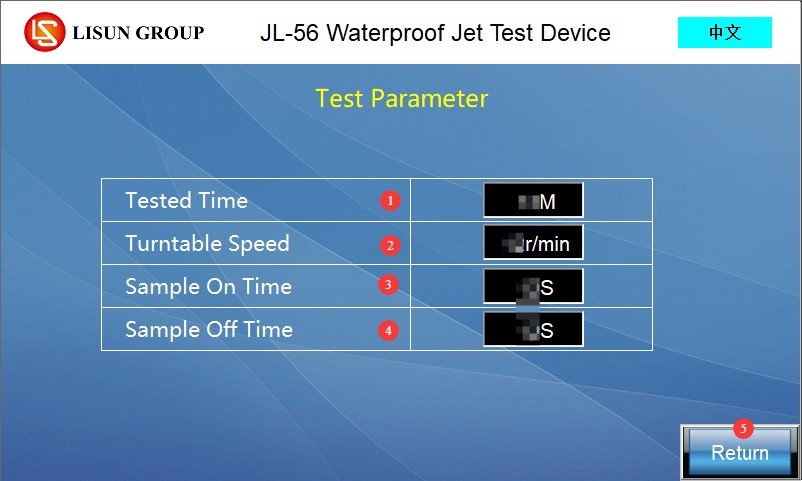
Рисунок 8
Note: Continuous power supply: Power-on time = test duration; power-off time = 0 s; No power supply: Power-on time = 0 s; power-off time = test duration.
4.1.3 Окно ручного управления
| № | Внимание |
| ① Переключатель насоса | Turn the water pump on/off |
| ② IPX5 Solenoid Valve | You can turn the IPX5 solenoid valve on or off; press ① and ② to turn on the IPX5. Note: You must open the valve at the IPX5 nozzle beforehand. |
| ③ IPX6 Solenoid Valve | You can turn the IPX6 solenoid valve on or off; press ① and ③ to turn on the IPX6. Note: You must open the valve at the IPX6 nozzle beforehand. |
| ④ Turntable Rotates Clockwise | Нажмите, чтобы повернуть поворотный стол по часовой или против часовой стрелки; отпустите, чтобы остановить вращение. Примечание: Если между поворотным столом и образцом есть провода, не вращайте его в одном направлении в течение длительного времени, чтобы избежать запутывания проводов. |
| ⑤ Turntable Reversal | |
| ⑥ Sample Power Supply | Если источник питания образца и образец соединены, вы можете включать или выключать источник питания образца. |
| ⑦Назад | Нажмите, чтобы вернуться к рабочему интерфейсу. |
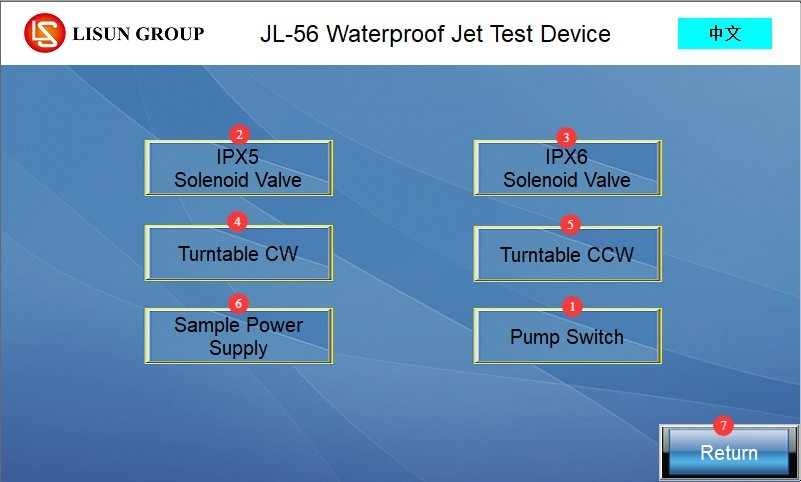
Рисунок 9
4.2 Описание интерфейса программной сигнализации
Incorrect phase sequence. The device is powered by three-phase electricity. Please turn off the power, swap the connections of any two live wires, and then turn the device back on.
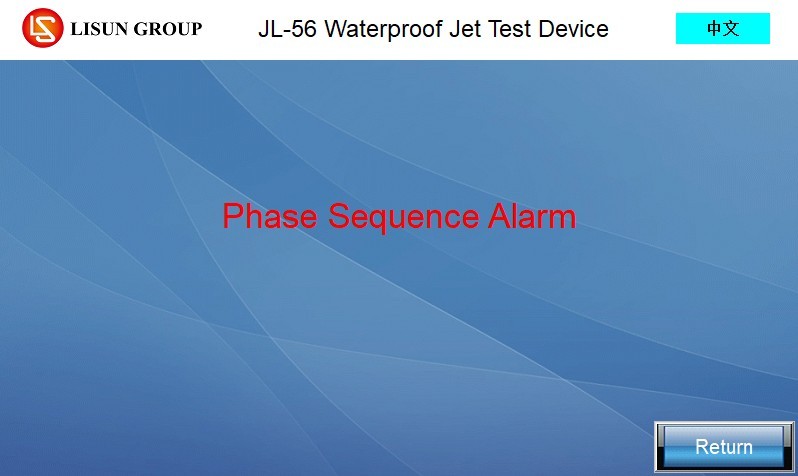
Рисунок 10
Кнопка аварийной остановки не сброшена. Пожалуйста, поверните кнопку аварийной остановки по часовой стрелке, чтобы сбросить ее, затем повторите попытку.
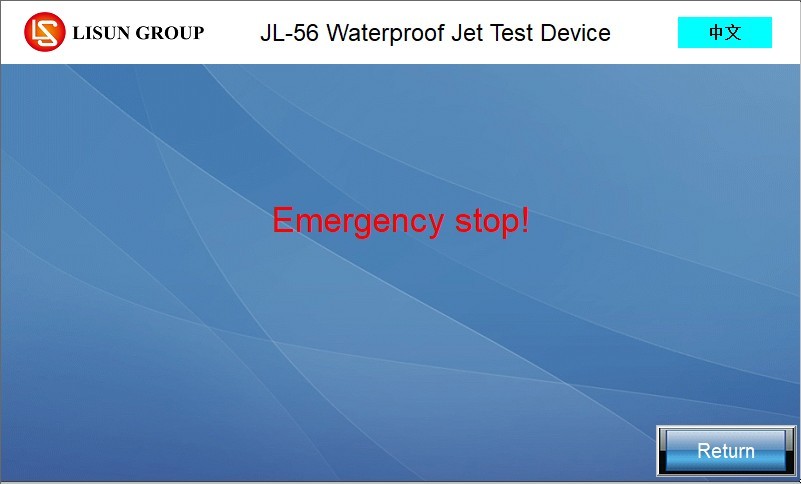
Рисунок 11
The water spray test is complete. Click “Back” to continue.
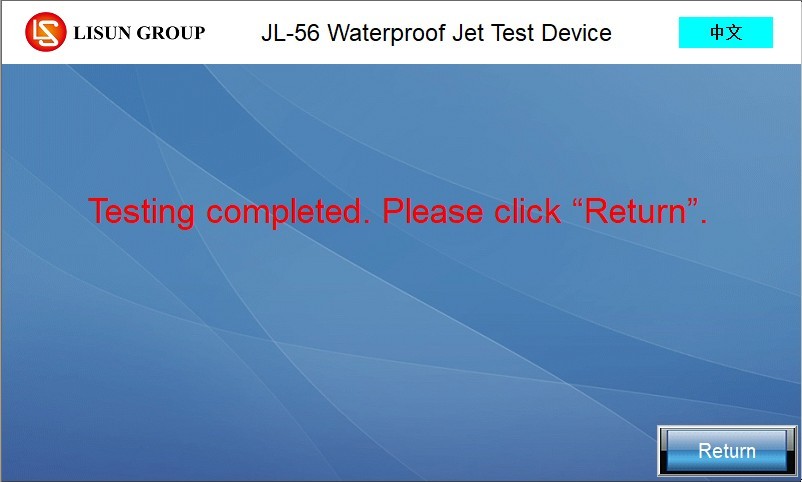
Рисунок 12
Рейтинг водостойкости не выбран. Пожалуйста, нажмите «Назад», выберите рейтинг водостойкости, который хотите проверить, и попробуйте снова.
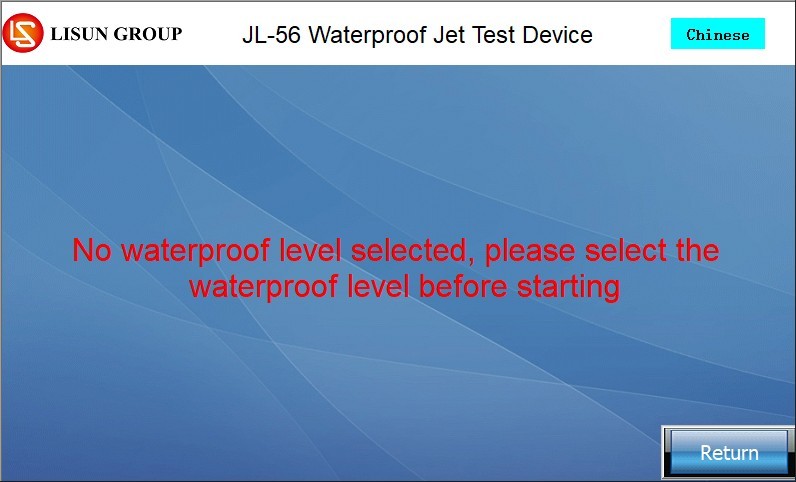
Рисунок 13
Время тестирования не было сброшено. Пожалуйста, нажмите «Назад», затем нажмите «Сброс», чтобы очистить данные предыдущего теста и повторить попытку.
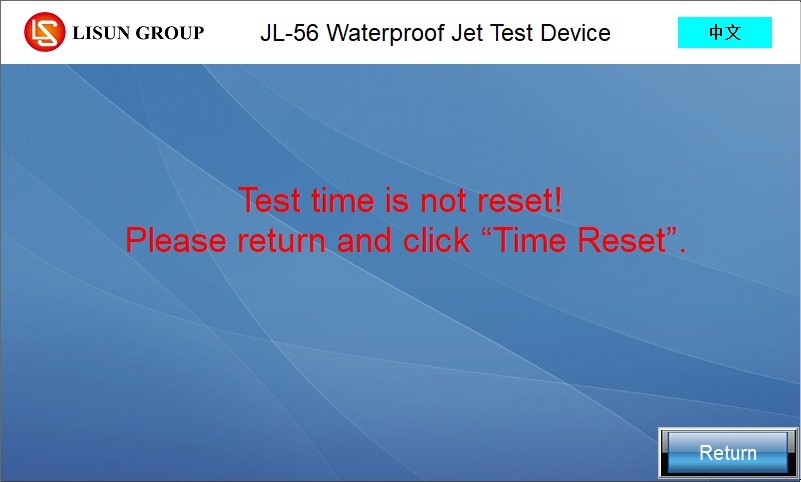
Рисунок 14
The water tank is low on water. Please ensure there is sufficient water in the tank. An electronic float switch at the bottom of the tank monitors the water level. If the water level is sufficient but a low-water alert still appears, check to see if the electronic float switch is blocked by debris. Remove any debris and allow the float to rise. Tap “Back” to clear the alert.
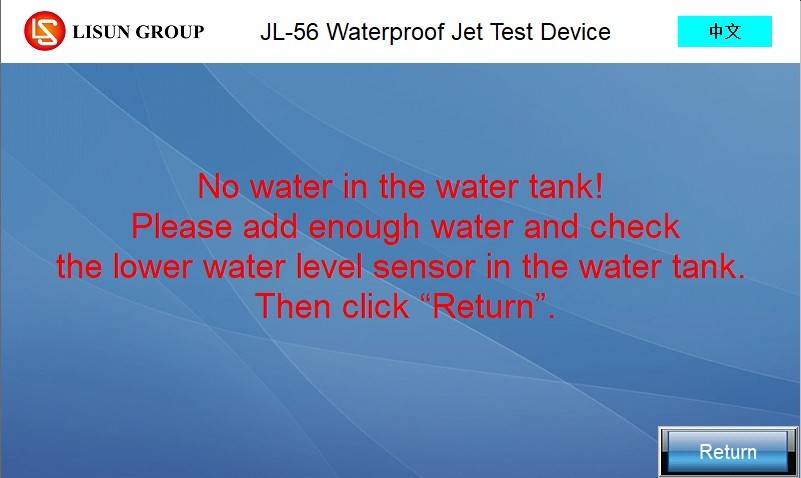
Рисунок 15
5. Подготовка к тесту
5.1 Пример установки
5.1.1 Предварительная проверка образцов
Inspect the sample to ensure it is in good condition and free of damage or deformation; confirm the test requirements for the sample (whether power-on testing is required and the waterproof rating). If power-on testing is required, refer to Section 3.1.2 to connect the sample’s power cord to an appropriate power source.
5.1.2 Пример установки и размещения
Поместите образец точно в центр поворотного стола и надежно закрепите его стяжным ремнем, чтобы предотвратить его смещение или падение во время вращения поворотного стола;
For electrical testing, follow the instructions in Section 3.3 to connect the sample using a waterproof plug, socket, and power cord. Check that the connections are secure, with no looseness or short circuits, and verify that all connections are properly waterproofed.
5.2 Предпусковые работы оборудования
5.2.1 Проверка работоспособности оборудования
If the equipment has not been used for an extended period, or if you need to verify in advance that all its functions are still operating normally, refer to Section 4.1.3 to check and confirm that the equipment’s pump, solenoid valve, turntable, sample power supply, and other functions are working properly.
5.2.2 Water Flow Pre-regulation
Still referring to Section 4.1.3, turn on the water pump and the IPX5/IPX6 solenoid valves. Adjust the IPX5/IPX6 flowmeter knobs so that the IPX5 water flow rate is 12.5 ± 0.625 L/min and the IPX6 water flow rate is 100 ± 5 L/min.
Once commissioning is complete, you can turn off the pump and solenoid valve.
6. Испытание на стойкость к распылению воды
6.1 Тест запуска
On the touchscreen program interface, select the IPX5 or IPX6 waterproof rating you wish to test. If the sample is powered on, click “Sample Power.” Then click “Clear and Reset.”
Open the valve at the IPX5/IPX6 nozzle, then click “Start Test” to begin the water spray test. Please hold the nozzle and its bracket with one hand to ensure the water jet is aimed at the test area of the sample.
6.2 Real-Time Monitoring of Tests
6.2.1 Расход воды
If the flow rate fluctuates during testing, you can fine-tune the flowmeter knob to keep the water flow rate stable at the standard flow rate.
6.2.2 Rotating Stage and Sample
The turntable rotates at a constant speed as set, with the sample holder unobstructed by water, ensuring that the sample is sprayed from all directions. If any abnormalities are detected, the test may be stopped, adjusted, and then restarted.
6.2.3 Electrical Conditions of the Sample
Power to the sample is automatically turned on and off according to the set schedule. If an abnormality occurs during the test—such as a short circuit—the test can be stopped immediately; after inspecting the sample, the test can be resumed.
7. Процедуры после испытаний
7.1 Действия, которые необходимо предпринять сразу после завершения теста
7.1.1 Remove the sample
Press the “Stop Test” button, or wait for the test to end automatically; the turntable will stop rotating, and power will be cut off to the sample (for samples undergoing powered testing). Remove the sample from the turntable.
7.1.2 сенсорный экран
Проверьте, правильно ли работает индикатор времени тестирования на рабочем интерфейсе, затем нажмите «Очистить и сбросить», чтобы подготовиться к следующему тестированию.
НИКОГДА не выключаться
После завершения всех испытаний за день перекройте подачу воды и отключите питание оборудования.
7.3 Оценка результатов испытаний
Протрите поверхность образца сухой тканью, чтобы удалить пятна от воды, а затем проведите тест. Определите, прошел ли образец тест, на основе следующих критериев.
| Критерии оценки | Особые требования |
| Безопасность | Недостаточное водоснабжение не влияет на нормальную работу оборудования и не ставит под угрозу безопасность. |
| Изоляция Защита | Вода не скапливается на изолированных компонентах, где она могла бы вызвать обратные связи вдоль пути утечки. |
| Защита электрических компонентов | Вода не должна попадать в токоведущие части или обмотки, не предназначенные для работы во влажных условиях. |
| Защита кабеля | Вода не скапливается вблизи концов кабеля и не попадает внутрь кабеля. |
| Эффективность дренажных отверстий | Если имеются дренажные отверстия, необходимо убедиться, что поступающая вода не будет скапливаться и может быть слита без повреждения оборудования. |
| Оборудование без сливного отверстия | Если вода скапливается и представляет опасность для токоведущих частей, следует соблюдать критерии приемки, указанные в соответствующих стандартах на продукцию. |
8. Ежедневное техническое обслуживание и уход за оборудованием.
8.1 Ежедневная уборка
Wipe water spots and dust from the surface of the equipment, paying special attention to the turntable and test area to prevent water spots from leaving behind limescale;
Протрите сенсорный экран и панель управления сухой тканью, чтобы предотвратить попадание воды и пыли во внутренние электронные схемы.
8.2 Периодические проверки
Connections: Check all connections on the swing pipe, water lines, and electrical circuits to ensure there are no leaks or loose fittings.
Thoroughly clean the water tank at least once a week: Drain any standing water, then wipe it dry with a clean cloth. After cleaning, check the inner walls of the tank for rust or scale buildup. If there is minor rust, gently wipe it with a rust remover, then rinse thoroughly with clean water.
8.3 Техническое обслуживание простаивающего оборудования
8.3.1 Short-term Idle Period (Within 1 Month)
Drain all standing water from the tank and water lines to prevent scale buildup in the nozzles and pipes;
Cover the entire piece of equipment with a dust-proof cover to prevent dust from entering;
Храните оборудование в сухом, хорошо проветриваемом месте.
8.3.2 Длительная бездеятельность (более 1 месяца)
Complete all maintenance procedures for short-term non-use; disconnect all electrical and water connections from the equipment; remove the water hoses, let them air dry, and store them properly;
Apply a layer of rust-preventative oil to the inner walls of the water tank and the surfaces of metal parts to prevent rust; store the equipment in a cool, dry place away from direct sunlight;
Apply a small amount of industrial lubricant to moving parts, such as the turntable bearings, to prevent rust and jamming;
Оборудование следует включать раз в месяц. Для проверки всех функций войдите в ручную регулировку экрана, затем выключите его через 5-10 минут работы, чтобы предотвратить износ цепей.
9. Поиск и устранение распространенных проблем
| Признаки неисправности | Возможные причины | Метод |
| Сенсорная сигнализация | См. 4.2 | |
| The touchscreen is lit, but the buttons do not respond when tapped | Touchscreen freezes, has stains or water marks on the surface, or has a faulty internal touch module | Turn off the device, wait 5 minutes, and then restart it; wipe the touchscreen with a dry cloth to remove any dirt or water stains; if it still does not respond, please contact us for repair. |
| Water flows intermittently from the nozzle | Insufficient water in the tank; air in the water lines | Please make sure there is enough water in the tank; continue running the unit to purge the air from the water lines. |
| Недостаточный поток воды | Foreign matter in the flow meter, foreign matter in the solenoid valve, foreign matter in the water pump | Please check whether the flow meter is functioning properly, whether there is any debris inside, and whether the gasket has fallen out. Remove the flow meter from the unit, clear out any debris, or reinstall the gasket. Please contact us to have the solenoid valve and water pump inspected. |
| IPX5 and IPX6 Water Spray Tests Conducted Simultaneously | There are foreign objects in the solenoid valve | Please contact us to have the solenoid valve inspected. |