
 Английский
 中文简体
中文简体 Русский
 Español
 Português
 Türkçe
 العربية
 Deutsch
 Polski
 Italiano
 Français
 한국어
한국어 ไทย
ไทย Tiếng Việt
 日本語
日本語





























Портативный Спектрофотометр
Руководство пользователя
Применимый LISUN models: HSCD-780、HSCD-800,HSCD-860
1. Распаковка и базовое ознакомление с оборудованием.
1.1 Основные технические характеристики
| Технические характеристики/номера моделей | HSCD-780 | HSCD-800 | HSCD-860 |
| Ключевые особенности | Small-Caliber Testing | Высокоточное тестирование | |
| Структура измерения | Д/8, ТСМ | Д/8, SCI+SCE | |
| Повторяемость измерений | ΔE*ab ≤ 0.05 | ΔE*ab ≤ 0.04 | ΔE*ab ≤ 0.02 |
| Разница между платформами | ARCXNUMX | ΔE*ab ≤ 0.4 | ΔE*ab ≤ 0.2 |
| Точность отображения | 0.01 | ||
| Измерительный диаметр | 1 stabilizer: Φ1 mm | There are two types: stable and agile: Φ11mm, ▽11mm | There are a total of 6 stable and agile types: Φ11 mm + Φ6 mm + Φ3 mm, ▽11 mm + ▽6 mm + ▽3 mm |
| Параметры измерения | CIE-Lab, CIE-LCh, HunterLab, CIE-Luv, XYZ, Yxy, RGB, color difference (ΔE*ab, ΔE*cmc, ΔE*94, ΔE*00), whiteness (ASTM E313-00, ASTM E313-73, CIE, ISO 2470/R457, AATCC, Hunter, Taube Berger Stensby), Yellowness (ASTM D1925, ASTM E313-00, ASTM E313-73), blackness (My, dM), color transfer fastness, color change fastness, tint (ASTM E313-00), color density CMYK (A, T, E, M), metamerism index Milm, Munsell, Hiding Power, Color Strength (Dye Strength, Tinting Power), Spectral Reflectance | ||
1.2 Распаковка и проверка содержимого
1.2.1 Распаковка и визуальный осмотр
При распаковке устройства обращайтесь с ним осторожно, чтобы не поцарапать корпус острыми предметами. После распаковки сначала осмотрите внешний вид устройства, чтобы убедиться в отсутствии видимых деформаций или вмятин, а также в том, что кнопки не повреждены и не расшатаны. Если вы обнаружите какие-либо неисправности устройства или его аксессуаров, пожалуйста, немедленно свяжитесь с нами.
1.2.2 Основной блок и принадлежности
| Номер регистрации | Внимание |
| ① | HSCD-860, including a calibration whiteboard stand and one measuring aperture |
| ② | Other alternative measurement diameters are available and can be selected based on the sample. |
| ③ | Black Calibration Box |
| ④ | USB-кабель |
| ⑤ | Зарядное устройство |
| ⑥ | Руководство по быстрому старту |
| ⑦ | Сумочка |
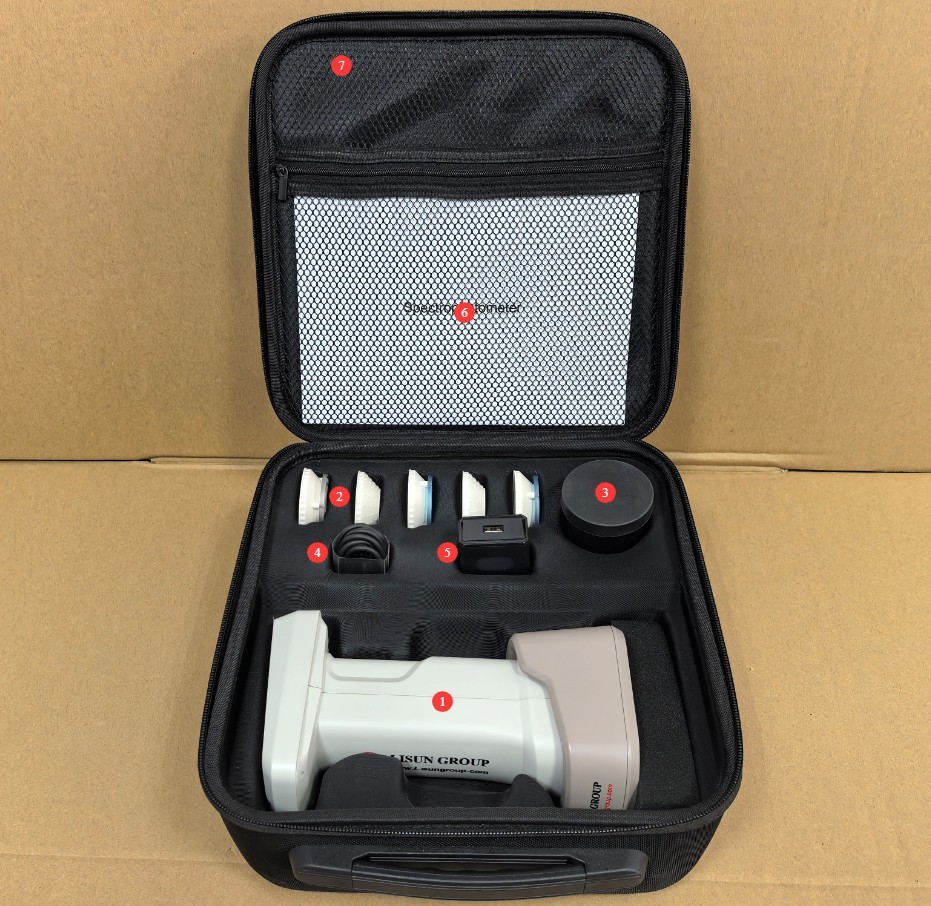
Рисунок 1
Ссылки для скачивания цифрового руководства пользователя, программного обеспечения, гарантийного талона и других материалов были отправлены по электронной почте. Пожалуйста, скачайте их как можно скорее. Если вы пропустили письмо, пожалуйста, свяжитесь с нами, чтобы запросить ссылки для скачивания еще раз.
1.3 Описание конструкции оборудования
| Номер регистрации | Внимание |
| ① Сенсорный экран | Display measurement results and configure parameters |
| ② USB port | Can be used to communicate with a computer |
| ③ Device Buttons | Power On (press and hold for 1 second), Power Off (press and hold for 3 seconds), Color Measurement (press briefly), Color Difference Measurement (press briefly) |
| ④ Selecting the Diameter Size | You can switch between M and S; the letter must match the letter on the measurement orifice. |
| ⑤ Calibrate the whiteboard stand | Used to calibrate equipment; it attaches to the measuring orifice end of the device via a magnetic mount. |
| ⑥ USB-порт | Can be used to charge devices |
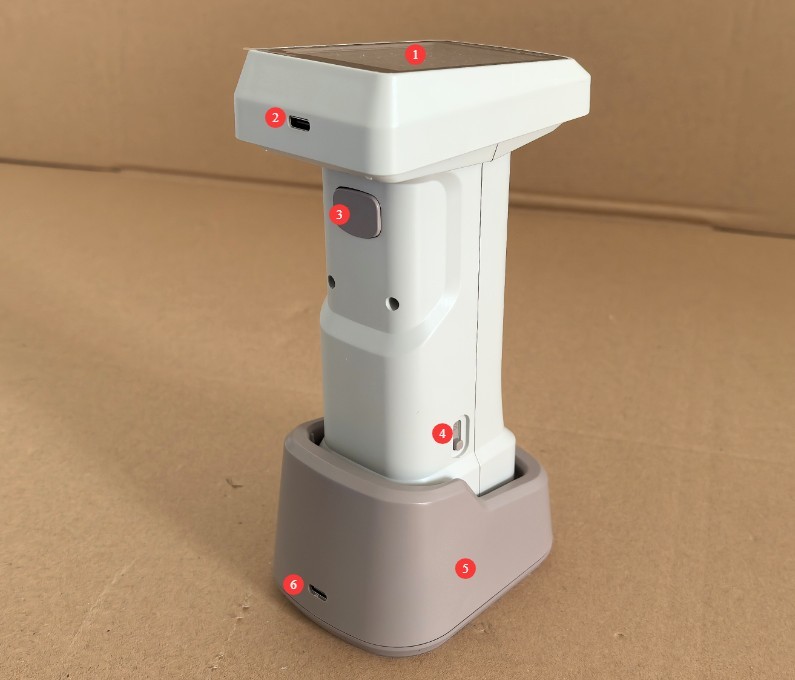
Рисунок 2
2. Меры предосторожности при использовании
2.1 Меры предосторожности перед началом эксплуатации
2.1.1 Подготовка окружающей среды
Before taking a measurement, allow the device and the sample to be measured to sit in the same environment for at least 30 minutes to ensure their temperatures are consistent. The measurement environment must be free from direct strong light and stray light interference. Avoid operating in environments with high temperatures, high humidity, or high dust levels. The ambient temperature should ideally be maintained between 10°C and 35°C, with relative humidity ≤80%(no condensation).
2.1.2 Подготовка проб
The surface of the sample being tested must be flat, clean, free of stains, and free of scratches. If the sample is a powder or liquid, it must be placed in a special sample dish to ensure that the sample surface completely fills the measurement aperture without any gaps; Select an appropriate measurement aperture based on the shape of the sample. Ensure that the measurement end fits snugly against the sample’s measurement area to prevent light leakage.
2.1.3 Осмотр оборудования
Перед включением устройства проверьте измерительный порт на наличие пыли или грязи и убедитесь, что кнопки и порты работают исправно. После включения устройства убедитесь, что батарея достаточно заряжена (если батарея разряжена, сначала зарядите ее, чтобы избежать отключения электроэнергии во время измерения).
2.2 Меры предосторожности при использовании
2.2.1 Процедуры измерения
When taking a measurement, position the device’s sensor perpendicular to and in close contact with the sample surface to avoid tilting or light leakage. After pressing the confirmation button, keep the device still until the measurement is complete (1 second); do not move the device during the measurement process. It is recommended to take 3–5 measurements of the same sample and use the average as the final result to minimize measurement errors.
2.2.2 Технические характеристики функциональности
Не выключайте устройство принудительно и не отключайте USB-кабель во время самодиагностики, калибровки или измерений. При переключении параметров измерения дождитесь полной загрузки дисплея, прежде чем переходить к следующему шагу. Если вам необходимо экспортировать сохраненные данные измерений, убедитесь в установлении соединения перед выключением устройства, чтобы предотвратить потерю данных.
2.2.3 Противопоказания к применению оборудования
Do not touch the optical components inside the measurement port with your hands, and do not point the measurement end toward a strong light source. Since this is a handheld device, do not drop, bump, or crush it, and avoid exposing the body to water or other liquids.
2.3 Безопасность источников питания и батарей
The built-in lithium-ion battery has a capacity of 3000mAh and is compatible only with the standard charger. Please note: Using a non-standard charger—especially a high-current fast-charging power adapter—can easily damage the battery.
Do not use the device for extended periods when the battery level is below 15%; do not charge the battery after it has been severely discharged, to avoid shortening its lifespan.
Во время зарядки обеспечьте хорошую вентиляцию помещения, держите зарядное устройство подальше от легковоспламеняющихся материалов и немедленно отключайте его от сети после завершения зарядки.
If the device will not be used for an extended period, fully charge it first, and then top it off every three months to prevent the battery from becoming damaged due to discharge.
2.4 Предупреждения о безопасности
Не пытайтесь разбирать или заменять какие-либо внутренние детали устройства. В случае неисправности обратитесь за помощью в официальную службу поддержки клиентов или к авторизованному дилеру. Несанкционированная разборка аннулирует гарантию;
If liquid, dust, or other substances enter the device, immediately turn off the power, unplug the charging cable, and contact customer service right away. Do not continue to use the device;
If equipment and accessories (such as measuring gauges) are accidentally swallowed by children, they may pose a risk of choking or other hazards; therefore, the equipment must be kept out of the reach of children;
Не размещайте устройство вблизи источников тепла, открытого огня или в условиях высоких температур, чтобы предотвратить вздутие батареи и повреждение компонентов устройства.
3. Эксплуатация оборудования
3.1 Калибровка оборудования
The device must be recalibrated when used for the first time or after being idle for more than 8 hours. Before turning on the device, place it on the calibration whiteboard base; once powered on, the device will automatically perform a white calibration.
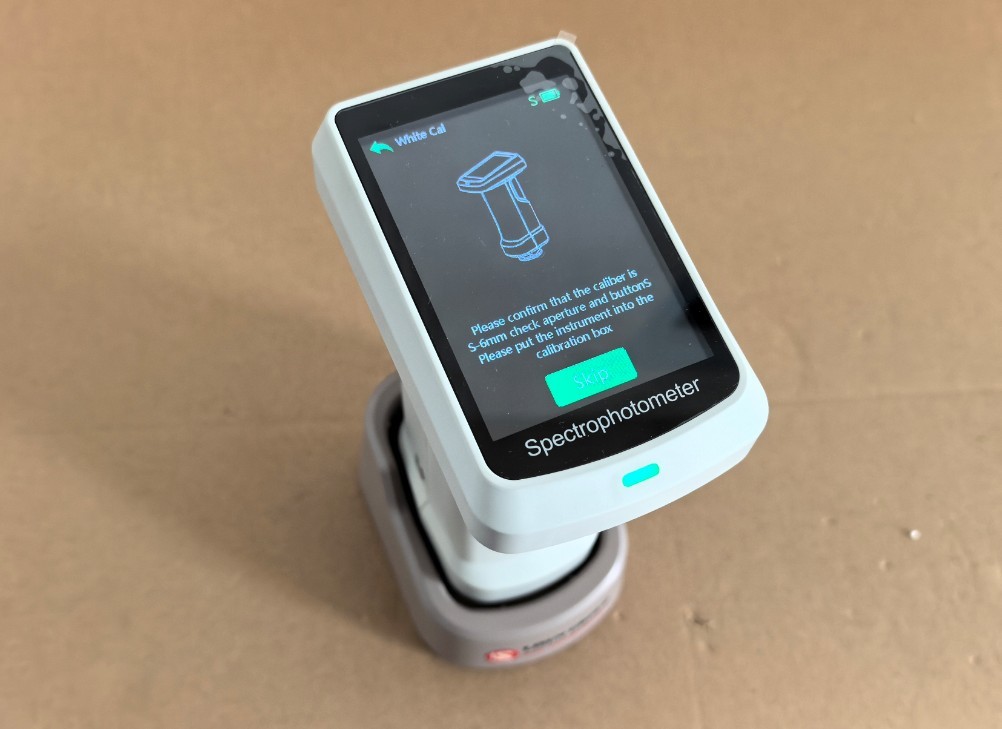
Рисунок 3
Once white calibration is complete, the system will automatically proceed to the black calibration screen. Follow the on-screen prompts and place the black calibration box under the measurement aperture.
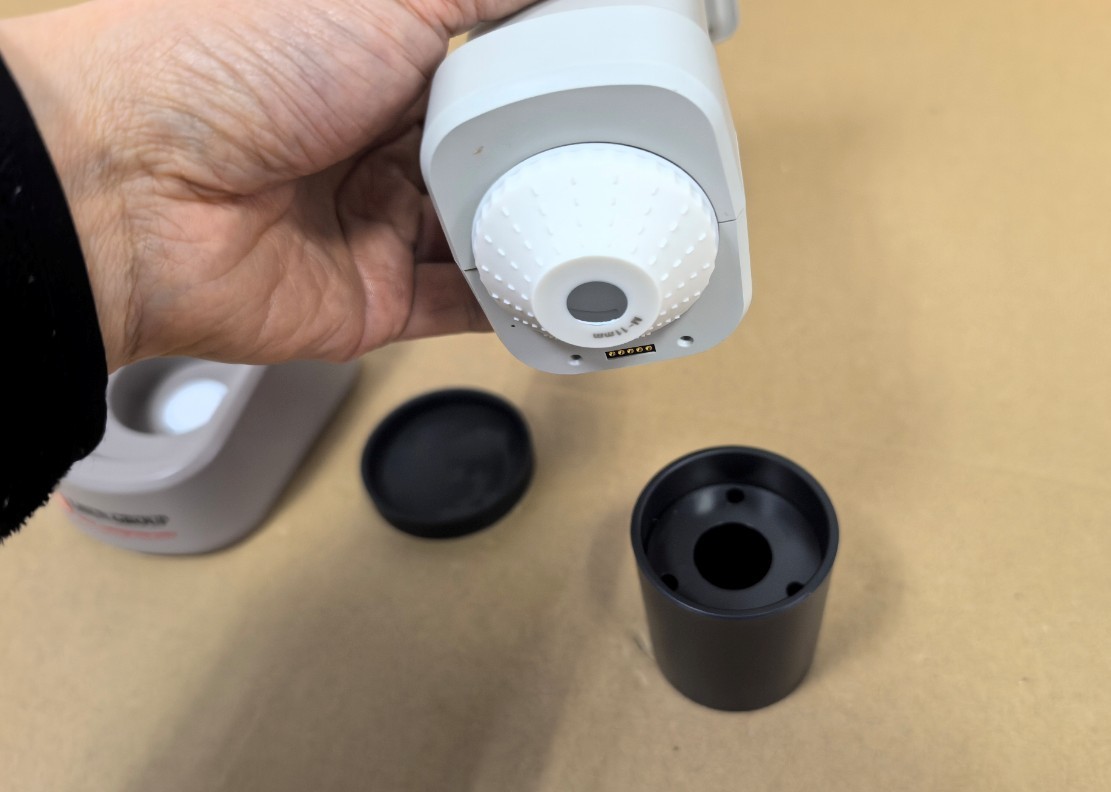
Рисунок 4
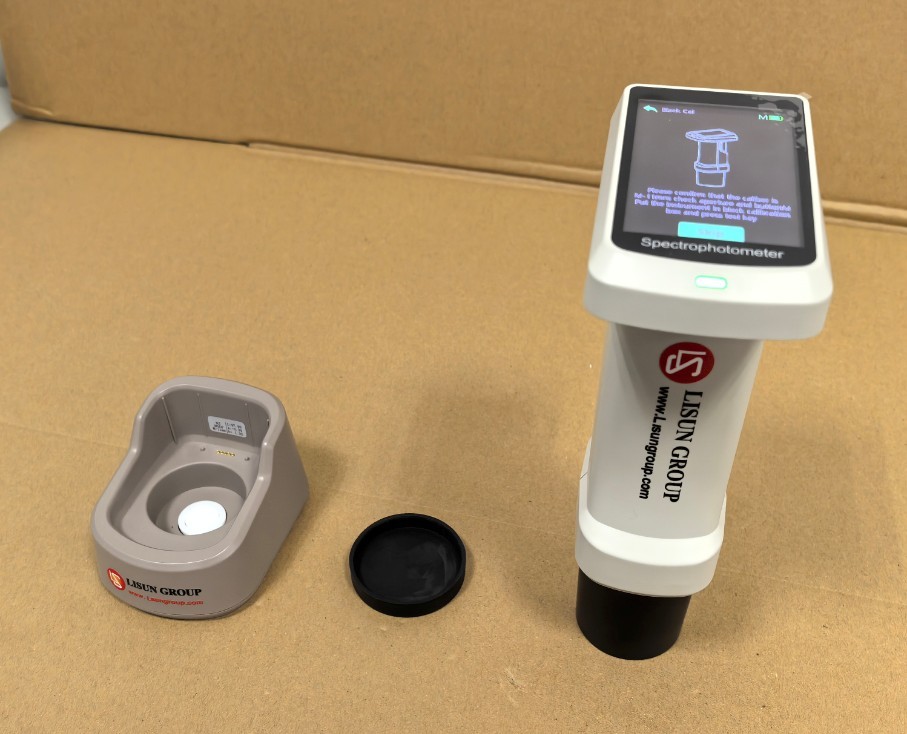
Рисунок 5
Then, briefly press the device button to complete the black calibration. The device will automatically enter the measurement screen.
Note: After replacing the measurement aperture with a different size, refer to Section 3.4.3.3 on active white and black calibration before proceeding with measurements.
3.2 Измерение цвета
3.2.1 Процедура измерения цвета
Press the device button once briefly to perform a color measurement. The device displays CIE-Lab parameters by default. You can start by measuring the calibration whiteboard.
| Номер регистрации | Внимание |
| ① | Click to save the color measurement results |
| ② | Click to open the color difference measurement interface |
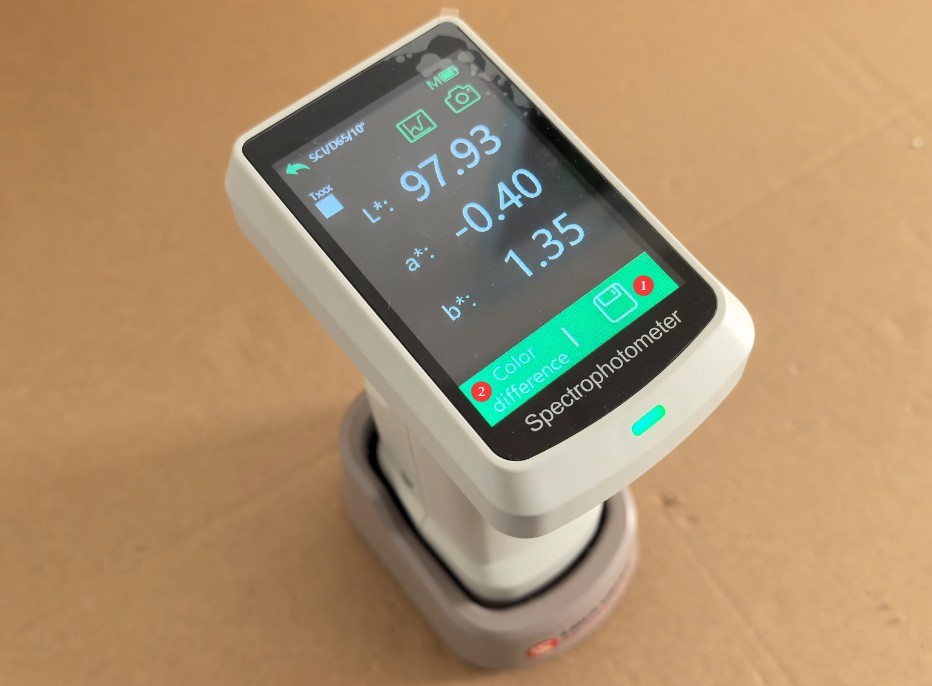
Рисунок 6
If the parameters match those marked on the calibration whiteboard stand, this indicates that the device’s test results are accurate.
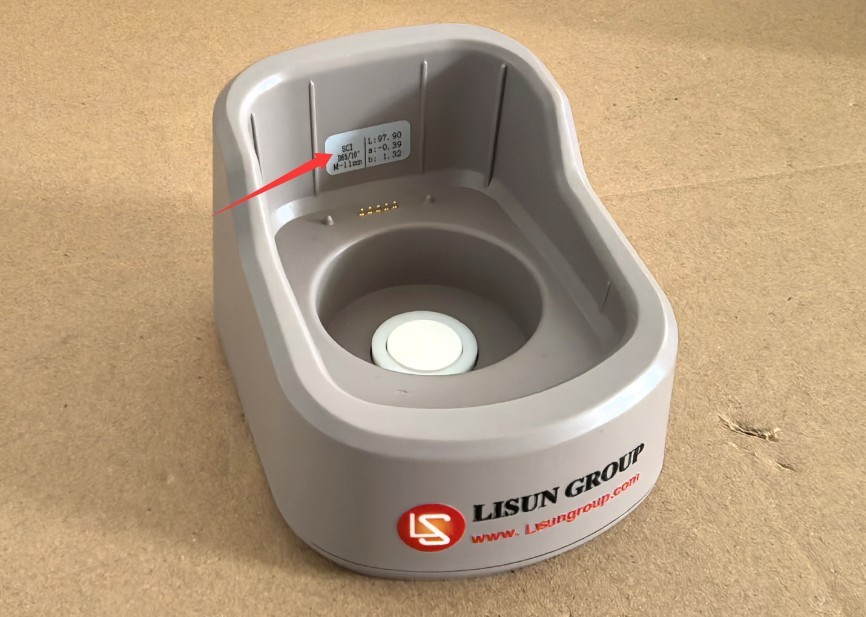
Рисунок 7
Note: The base is marked with the measurement aperture required for calibrating the whiteboard, as well as its CIE-Lab values.
3.2.2 Другие функции
| Номер регистрации | Внимание |
| ① | Спектр |
| ② | камера |
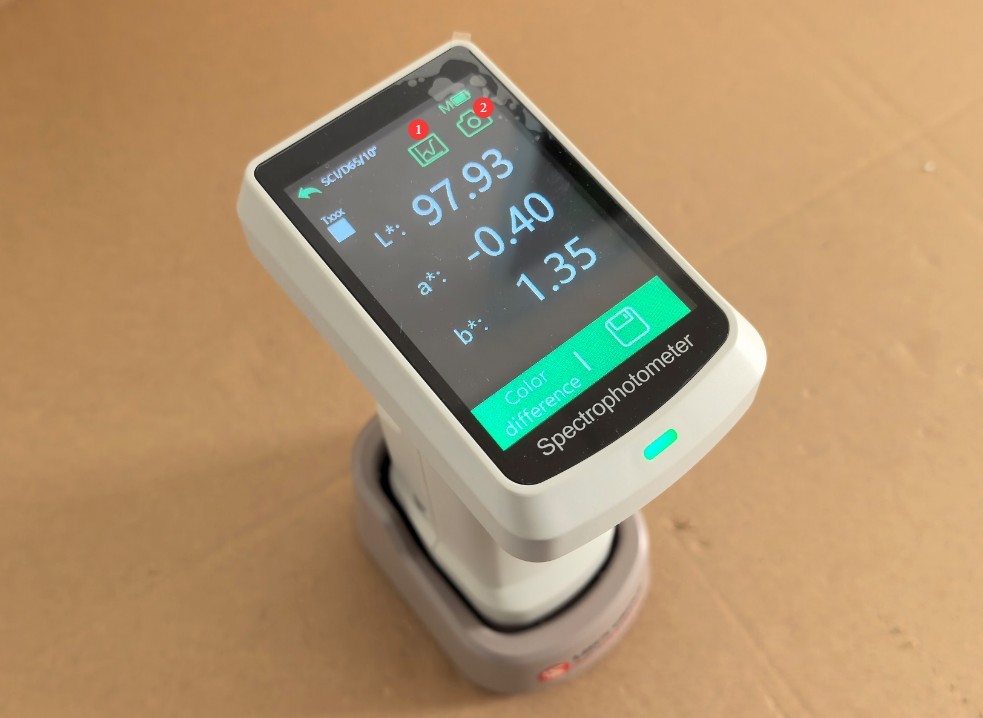
Рисунок 8
Click the “Spectrum” feature.
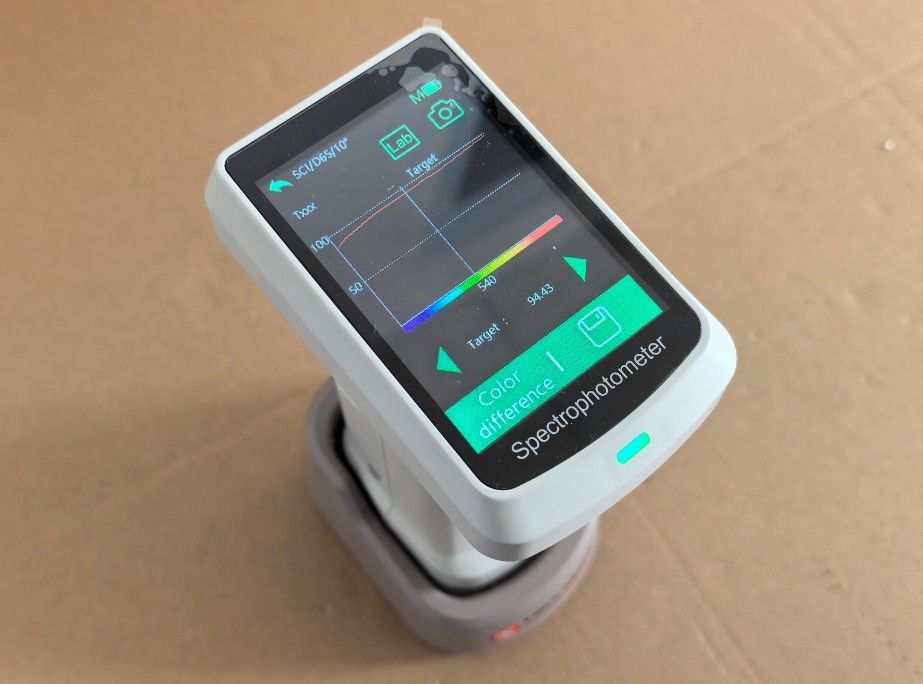
Рисунок 9
Tap the camera feature to verify that the sample is positioned within the measurement aperture.
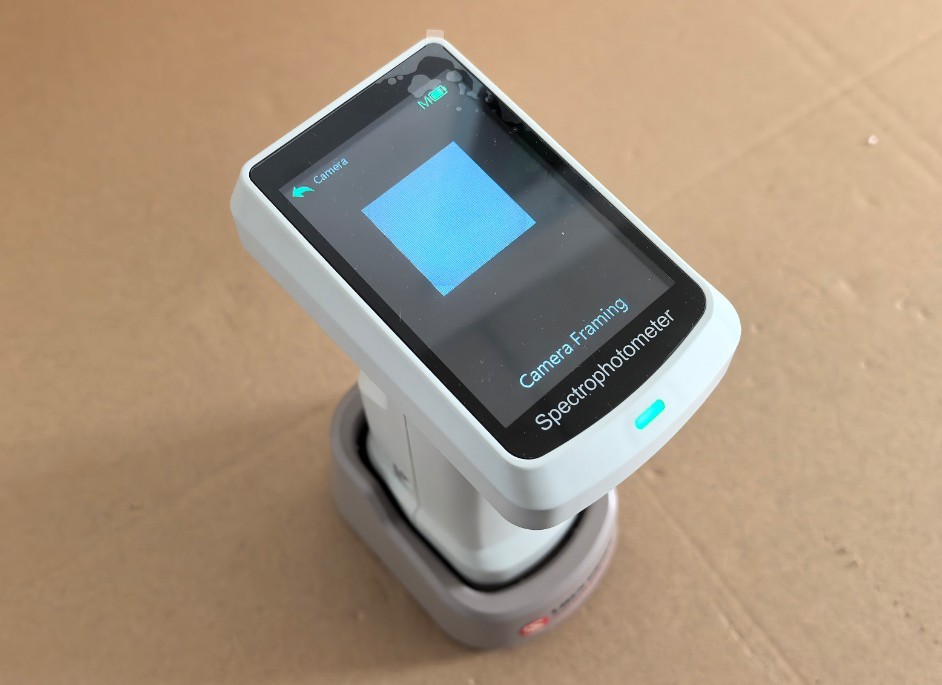
Рисунок 10
3.3 Процедура измерения разницы цветов
3.3.1 Сначала измерьте контрольные образцы.
The procedure for measuring the standard sample is the same as that for measuring color.
3.3.2 Повторное измерение разницы цветов
Click to open the color difference measurement interface.
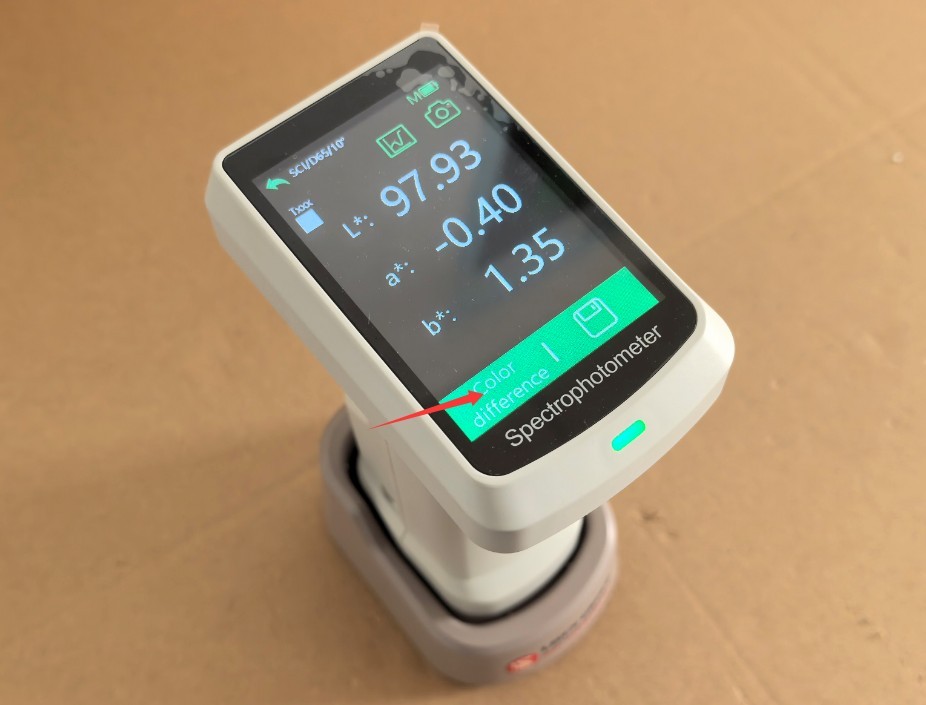
Рисунок 11
Then place the measuring aperture on the surface of the sample, briefly press the device button, and the color difference measurement will begin. The touchscreen interface displays the sample measurement results, as well as the color difference between the sample and the reference standard.
| Номер регистрации | Внимание |
| ① | Click to save the measurement results |
| ② | Click to return to the Color Measurement/Reference Sample Measurement screen |
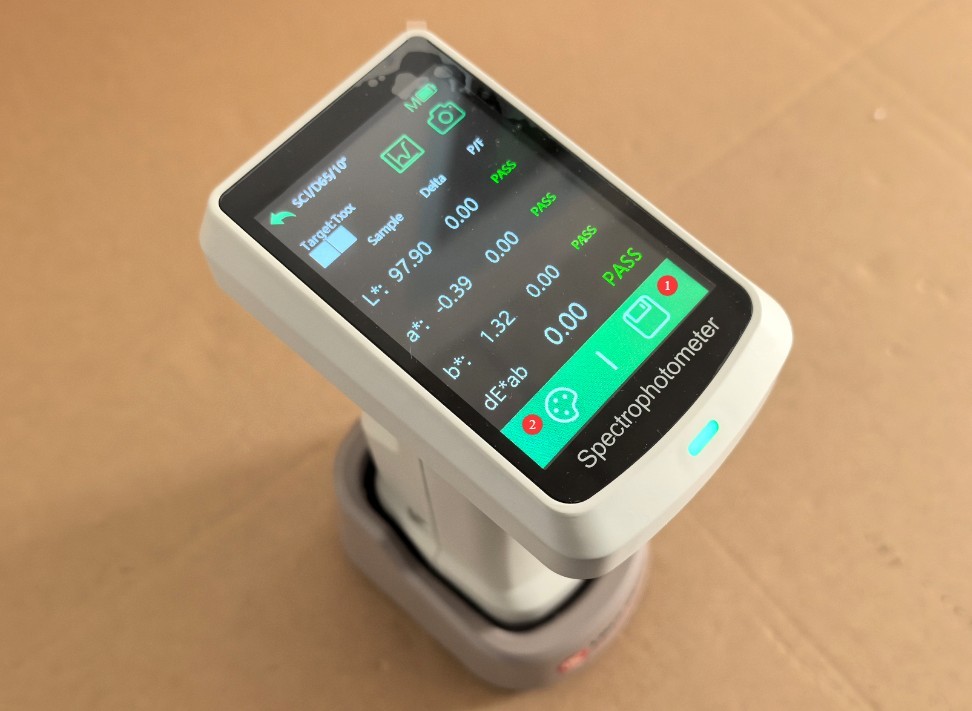
Рисунок 12
3.4 Introduction to Other Function Screens
3.4.1 Preview of the Functional Interface
Click to access the navigation screen for all device features.
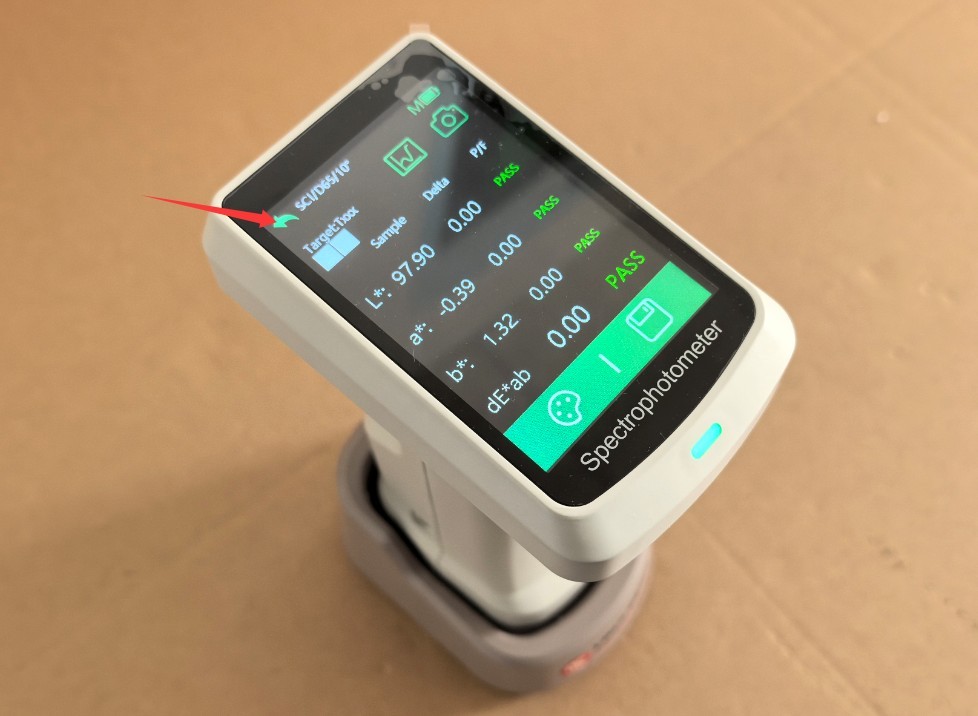
Рисунок 13
| Номер регистрации | Внимание |
| ① | Интерфейс измерения |
| ② | View more information about the current measurement results |
| ③ | View Saved Color Swatches |
| ④ | Настройки параметров |
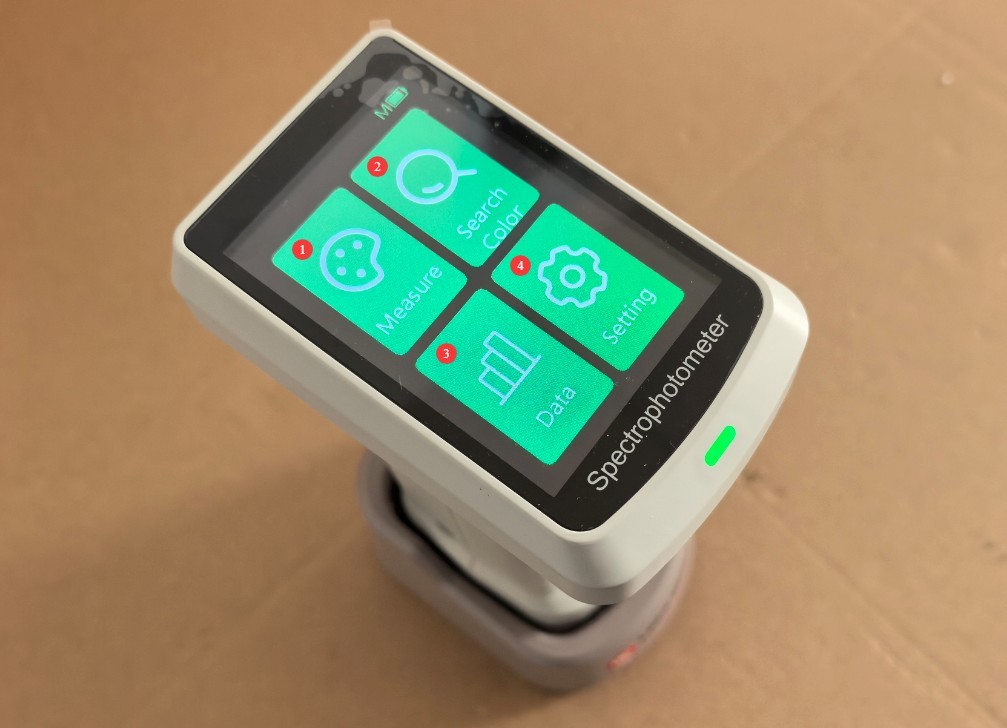
Рисунок 14
3.4.2 Viewing Saved Color Swatches
You can click to select a color swatch you saved previously.
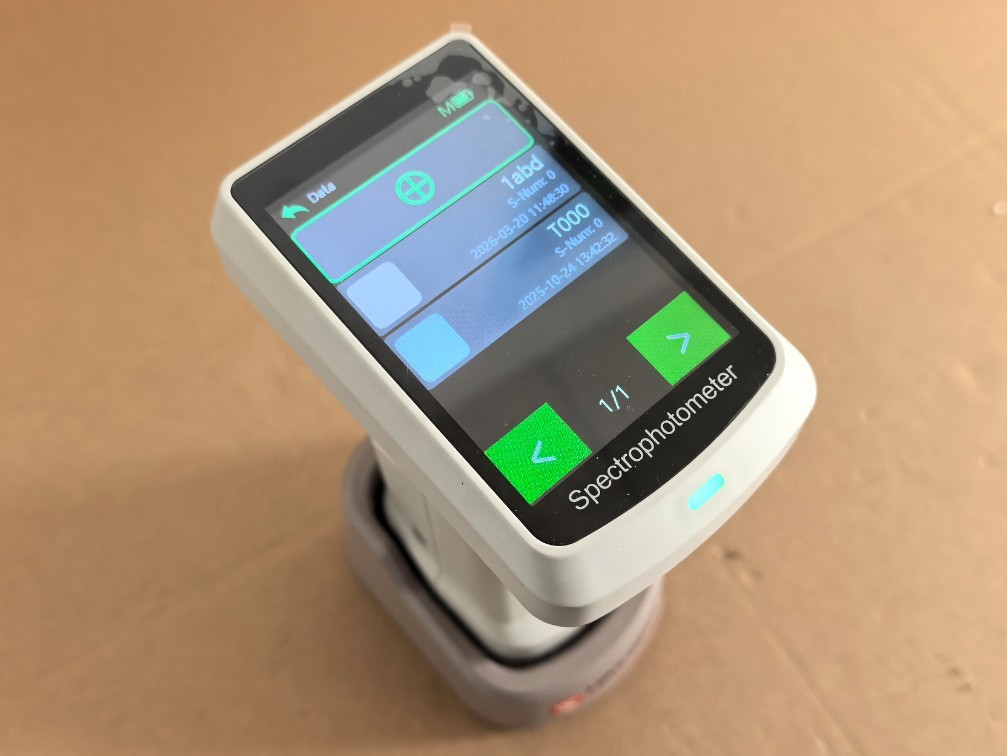
Рисунок 15
Click to use the current color chart as the reference standard and measure the color difference.
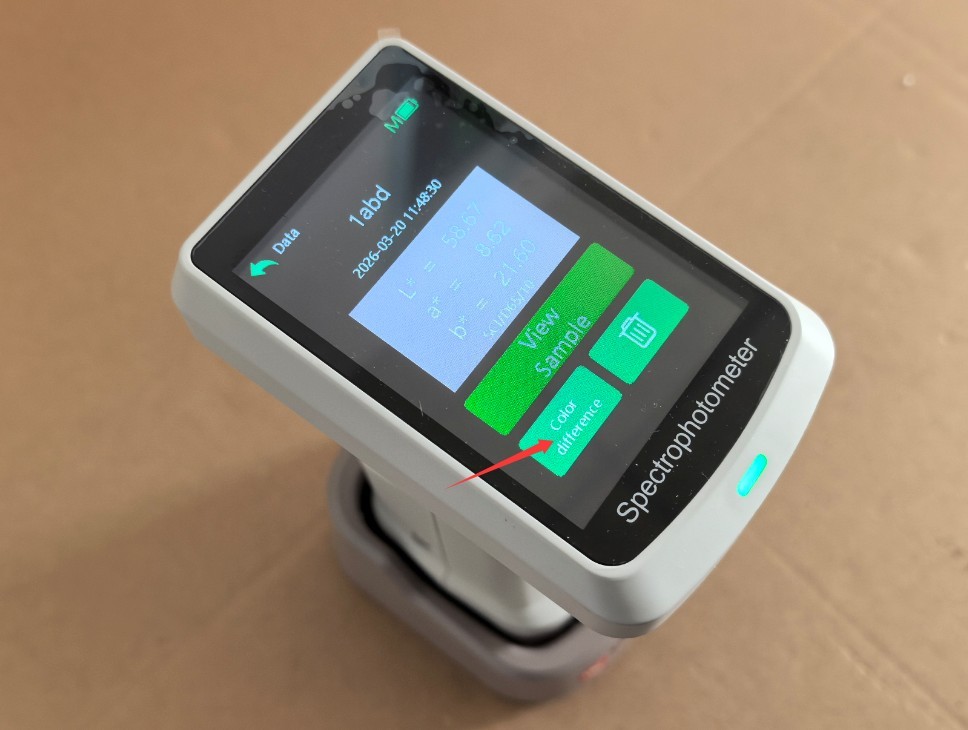
Рисунок 16
3.4.3 Интерфейс настройки параметров
| Номер регистрации | Внимание |
| ① | Настройки параметров измерения |
| ② | Настройки источника питания |
| ③ | Настройки времени |
| ④ | Display Language Settings |
| ⑤ | Калибровочные |
| ⑥ | Экран информации о продукте |
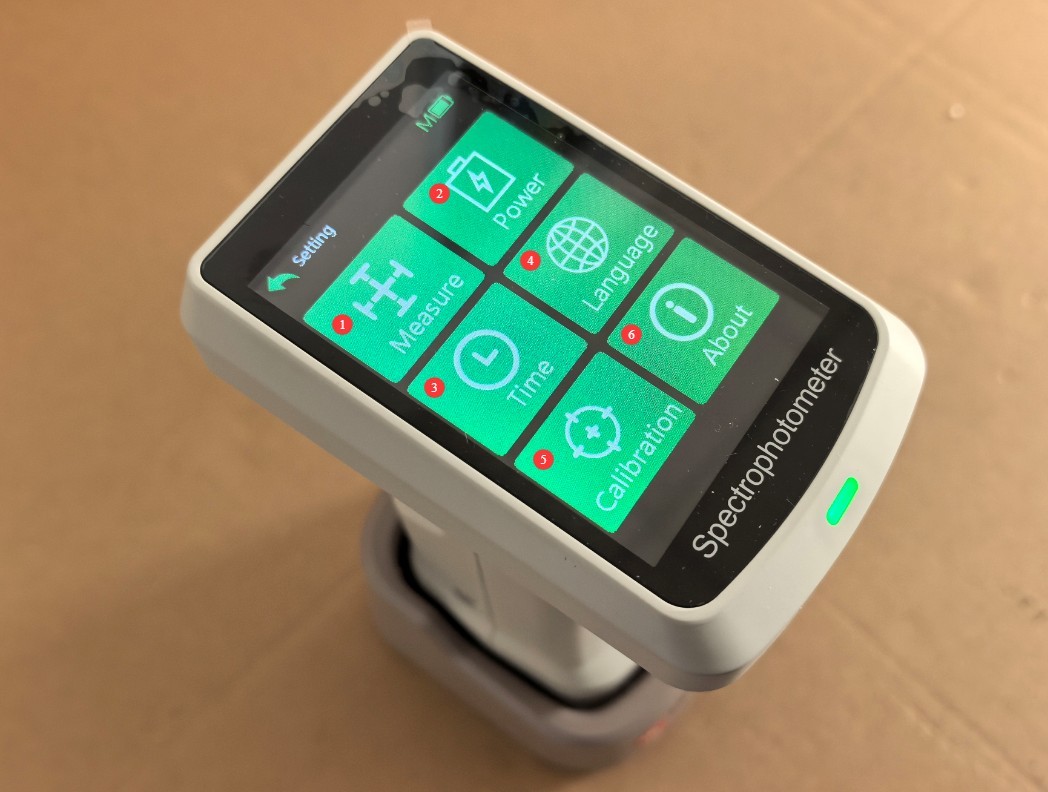
Рисунок 17
3.4.3.1 Настройки параметров измерения
You can configure the parameters you want to measure and modify the measurement settings.
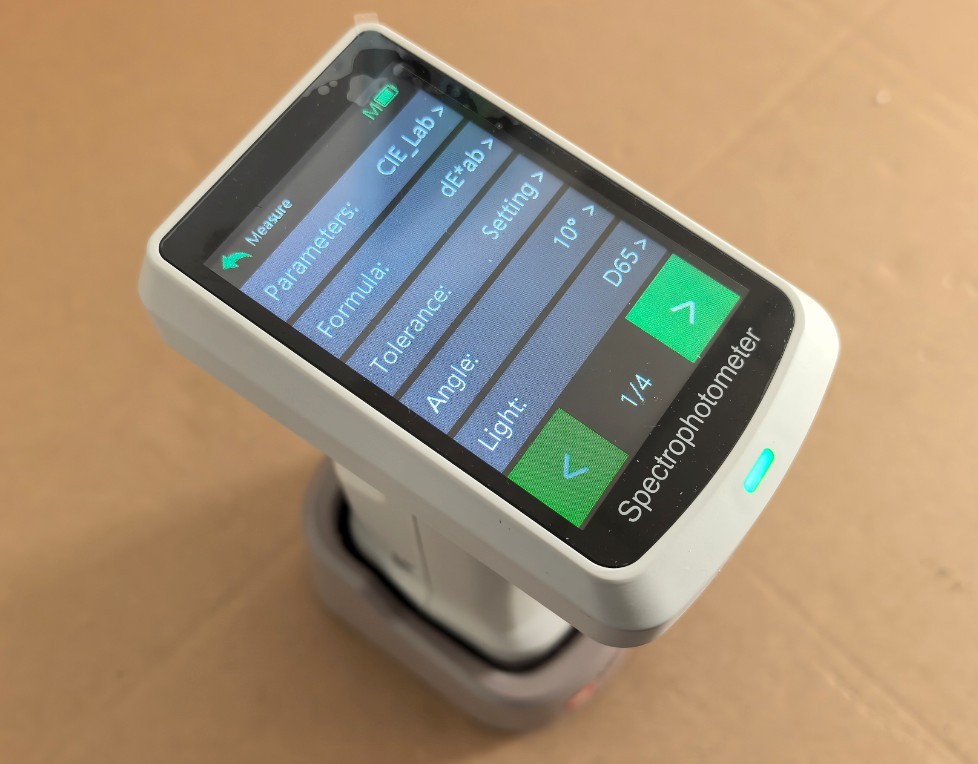
Рисунок 18
HSCD-860 can measure dozens of parameters; the default measurement parameter is CIE-Lab.
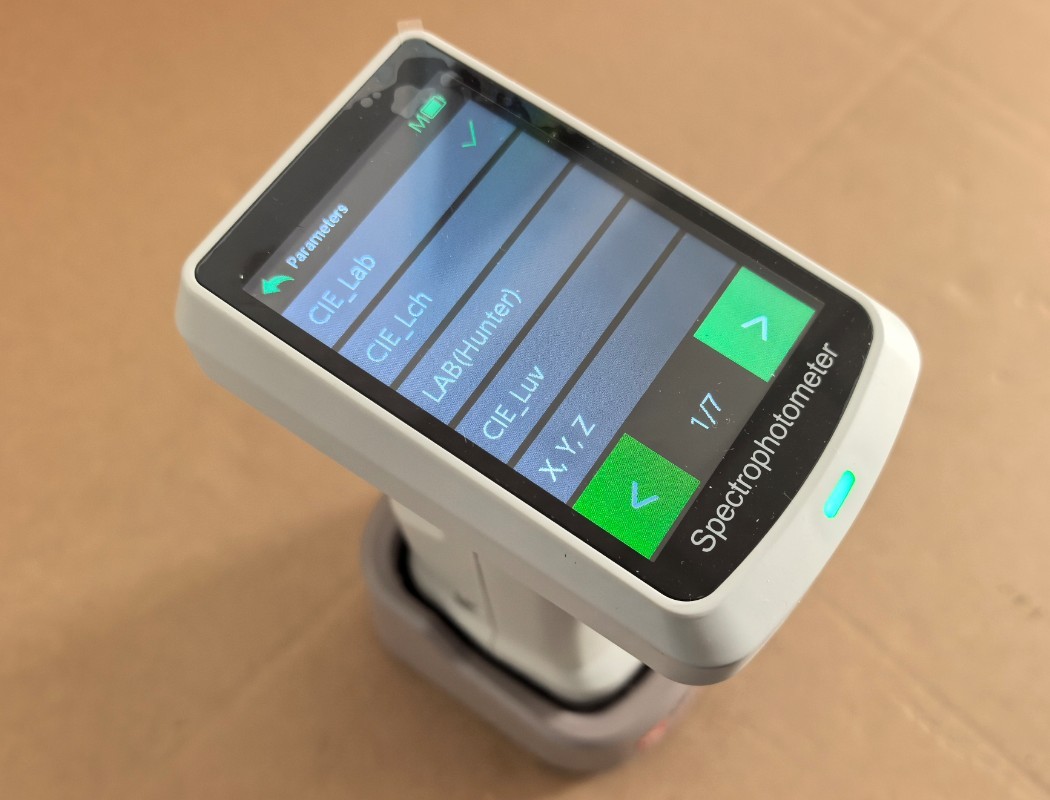
Рисунок 19
Note: After modifying the measurement parameters, please refer to Section 3.4.3.3 and run the calibration again.
3.4.3.2 Power Supply Parameter Settings
| Номер регистрации | Внимание |
| ① | Настройки автоматического выключения |
| ② | Auto-Screen-Off Settings |
| ③ | Bluetooth Switch (Note: You must turn on Bluetooth to connect the device using the mobile app.) |
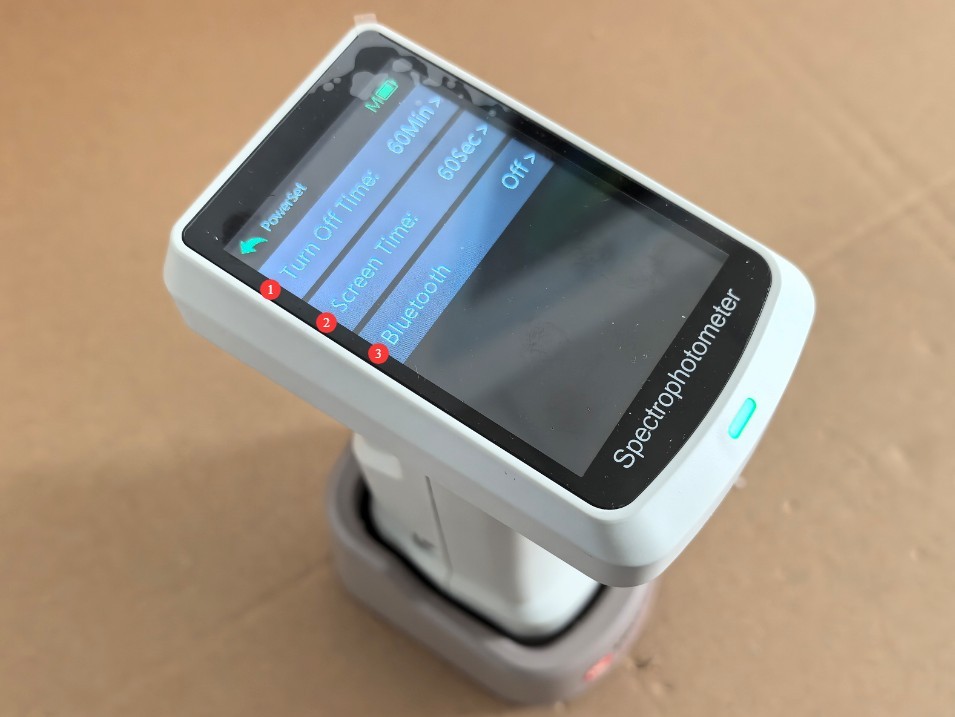
Рисунок 20
3.4.3.3 Калибровка
Place the device on the calibration whiteboard base, then tap to enter the calibration interface. The device will automatically perform white calibration; then, follow the instructions in Section 3.1 to perform black calibration.
4. Работа приложения
4.1 Online
Follow the instructions below to install the app on your phone.
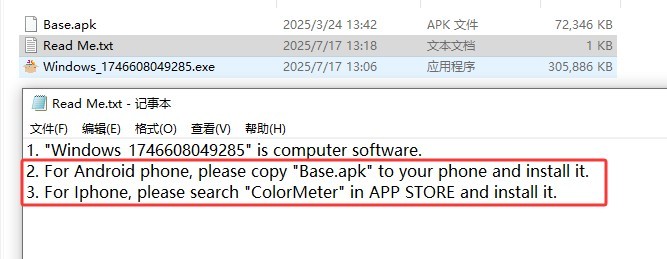
Рисунок 21
Refer to Section 3.4.3.2 to enable the HSCD-860’s Bluetooth functionality.
Откройте приложение и нажмите «Подключиться».
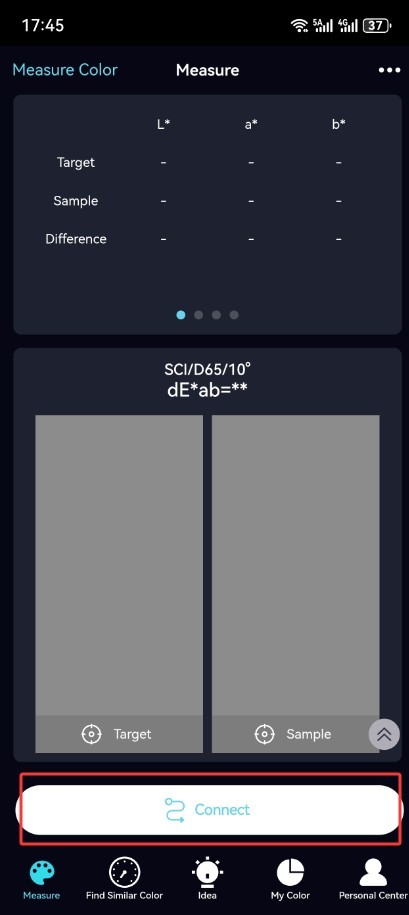
Рисунок 22
4.2 Калибровка
If the app prompts you to calibrate, follow the instructions to perform white calibration and black calibration.
4.3 Процедура измерения
4.3.1 Измерение цвета и измерение разницы цветов
| Номер регистрации | Внимание |
| ① | Нажмите слева, чтобы измерить цвет или измерить стандартный образец. |
| ② | Нажмите справа, чтобы измерить разницу в цвете образца. |
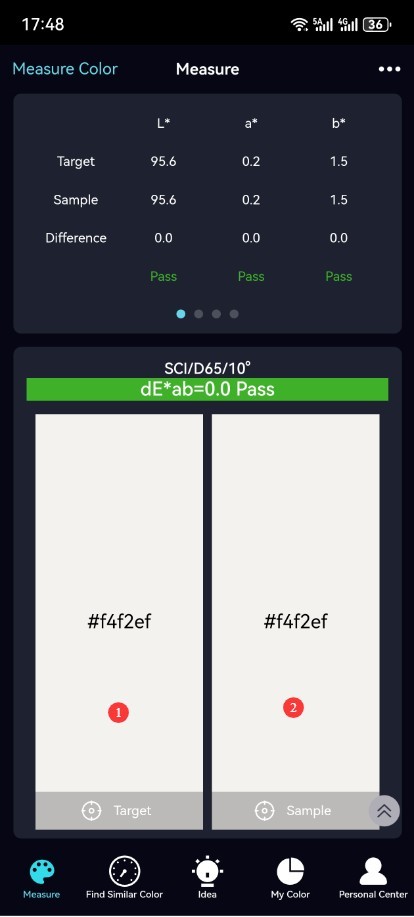
Рисунок 23
5. Работа с программным обеспечением
5.1 Подключение и калибровка
Refer to Section 1.3. Connect the HSCD-860 to the computer using the dedicated USB cable, and turn it on. Install the following software on the computer.
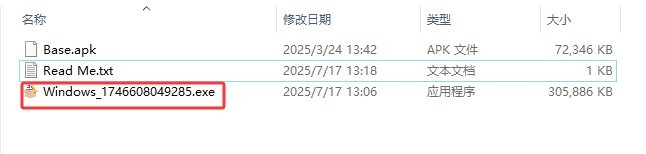
Рисунок 24
| Номер регистрации | Внимание |
| ① | Это платное программное обеспечение для управления цветом; вы не обязаны им пользоваться. |
| ② | Double-click to open this software; once it opens, it will automatically connect to the internet. |
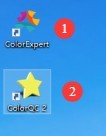
Рисунок 25
If the software prompts you to perform calibration, follow the on-screen instructions to perform white and black calibration.
5.2 Работа с программным обеспечением
| Номер регистрации | Внимание |
| ① | Нажмите, чтобы измерить цвет (измерительный образец). |
| ② | Нажмите, чтобы измерить разницу в цвете образца. |
| ③ | Список результатов измерений для всех эталонных образцов |
| ④ | Color difference measurement results for all samples relative to the reference standard |
| ⑤ | You can print and save measurement results; you can create a new measurement interface and open previously saved measurement reports. |
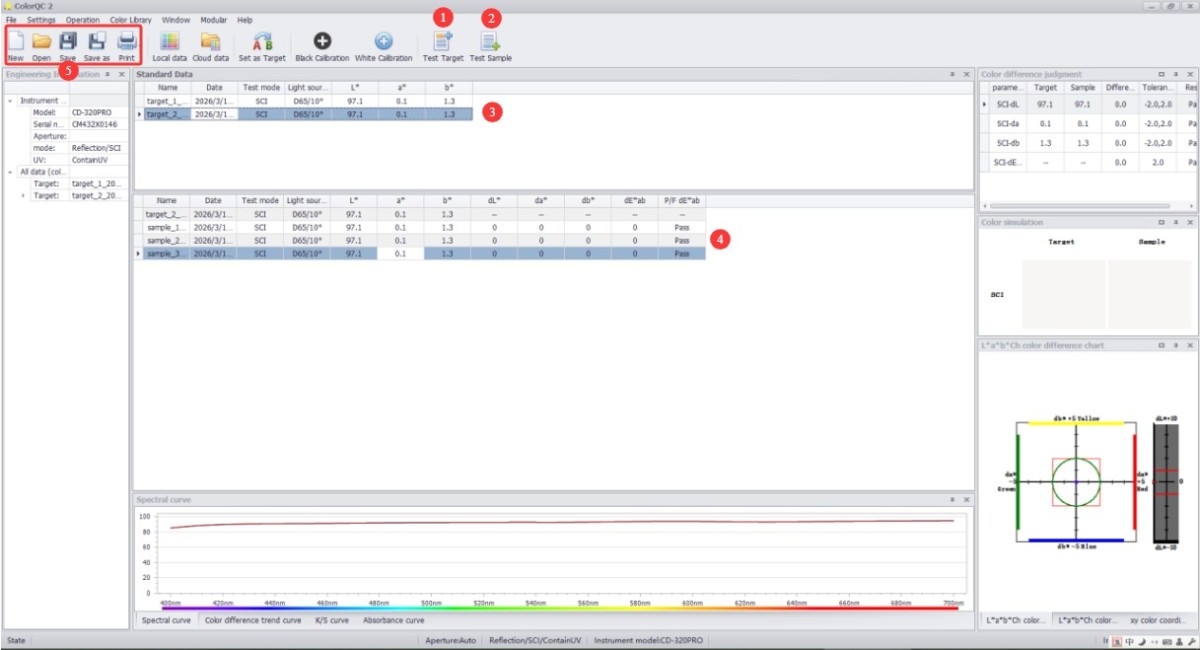
Рисунок 26
6. Ежедневное техническое обслуживание и уход за оборудованием.
6.1 Чистка и уход
6.1.1 Очистка корпуса и дисплея
Поверхность кузова: Протрите пыль и пятна с кузова чистой мягкой тканью. Для удаления стойких пятен слегка протрите загрязненный участок небольшим количеством воды. Не используйте моющие средства или другие едкие жидкости;
Экран: Аккуратно протрите экран специальной салфеткой для чистки экранов, чтобы избежать царапин. Не прикасайтесь к экрану непосредственно пальцами. Если на экран попала пыль, аккуратно удалите ее безворсовой щеткой.
6.1.2 Очистка калибровочной пластины
The calibration plate is a standard accessory; surface wear or stains will affect calibration accuracy: Gently wipe the surface of the calibration plate with a lint-free cloth; if there are stubborn stains on the surface of the calibration plate, contact customer service promptly to have it replaced. Do not sand or repair the calibration plate yourself.
6.2 Обслуживание батареи
6.2.1 Зарядка и техническое обслуживание
Use the USB cable that came with the device. Avoid charging the device in high-temperature environments, and unplug the cable immediately after charging is complete to prevent overcharging. Charge the device promptly when the battery level falls below 15% to avoid deep discharge of the lithium battery, which can shorten its lifespan.
6.2.2 Поддержание срока службы батареи
The device’s built-in lithium-ion battery is rechargeable; under normal use, a single charge allows for 10000 consecutive measurements;
When the device is not in use for an extended period, ensure the battery charge remains between 50% and 80%. Recharge the battery once every three months to restore the charge to between 50% and 80%, thereby preventing the battery from becoming deeply discharged or swelling;
Если батарея вздулась, протекла или значительно сократилось время её службы, немедленно прекратите использование и свяжитесь с нами для ремонта.
Поиск и устранение распространенных проблем
| Признаки неисправности | Возможные причины | Метод |
| Невозможно включить | Низкий уровень заряда батареи | Пожалуйста, используйте специальный USB-кабель для зарядки устройства; если после зарядки оно по-прежнему не включается, обратитесь к нам для ремонта. |
| Срок службы батареи ухудшился. | деградация батареи, чрезмерная температура окружающей среды | Contact us for repairs; using the device in high-temperature environments causes the battery to drain quickly—please use it in a normal environment. |
| Значительные ошибки в данных измерений | Failure to perform white and black calibration promptly and accurately; contamination of the calibration white plate; errors in the measurement of reference standards; contamination of the measurement aperture | Perform white and black calibration correctly; clean or replace the calibration white plate; remeasure the reference samples; clean the inside of the test ports with a lint-free brush; if the test ports show signs of physical damage, please contact us for repair. |