
 Английский
 中文简体
中文简体 Русский
 Español
 Português
 Türkçe
 العربية
 Deutsch
 Polski
 Italiano
 Français
 한국어
한국어 ไทย
ไทย Tiếng Việt
 日本語
日本語





























Прибор для испытания на абразивный износ изоляционных втулок штырей вилок
Руководство пользователя
Применимый LISUN модели: LS-B10
1. Базовое понимание оборудования
1.1 Ключевые параметры
1.1.1 Технические характеристики оборудования
| Параметры | Внимание |
| Рабочая станция | Одностанционная |
| Частота трения | 30 times per minute; each forward and backward movement counts as one |
| Массы | 4N |
| График работы | 9 mm, with approximately 7 mm of friction-resistant insulation sheath |
| Scraping Wire | Φ1 mm, effective length 6 mm |
1.1.2 Применимые стандарты
The LS-B10 Apparatus for Abrasion Test on Insulating Sleeves of Plug Pins is designed and manufactured in strict accordance with Clause 24.8 and Figure 28 of GB/T 2099.1, “Plugs and Sockets for Household and Similar Purposes—Part 1: General Requirements” (IEC 60884-1:2022, Пункт 23.2, Рисунок 31).
It is primarily used in electrical product quality inspection laboratories, the quality control departments of manufacturers of plugs, sockets, and electrical accessories, third-party testing organizations, and for import and export product inspections.
1.2 Проверка конфигурации оборудования
1.2.1 Распаковка
При распаковке устройства обращайтесь с ним осторожно, чтобы не поцарапать корпус острыми предметами. После распаковки сначала осмотрите внешний вид устройства, чтобы убедиться в отсутствии видимых деформаций или вмятин, а также в том, что кнопки не повреждены и не расшатаны. Если вы обнаружите какие-либо неисправности устройства или его аксессуаров, не включайте его. Немедленно свяжитесь с нами.
1.2.2 Основной блок и принадлежности
| Номер регистрации | Внимание |
| ① | Основной блок LS-B10 |
| ② | Шнур питания |
| ③ | 2 spare U-shaped steel wires |
1.2.3 Загрузка электронных документов
Мы уже отправили ссылки для скачивания электронного руководства пользователя, сертификата калибровки, гарантийного талона и других документов по электронной почте во время отгрузки. Пожалуйста, скачайте их как можно скорее. Если вы не получили письмо, свяжитесь с нами, чтобы запросить ссылки для скачивания еще раз.
2. Меры предосторожности.
2.1 Электробезопасность
Перед подключением сетевого шнура убедитесь, что напряжение питания составляет 220 В переменного тока ±10%, а частота — 50 Гц или 60 Гц. Необходимо использовать трехконтактную розетку с защитным заземлением, сопротивление которого должно быть ≤4 Ом. Никогда не перерезайте и не отключайте защитный заземляющий провод, так как это создает риск поражения электрическим током.
2.2. Экологическая безопасность
Do not use this equipment in environments with flammable or explosive substances, strong electromagnetic interference, high temperatures and humidity, or excessive dust levels. Place the equipment on a level, stable surface, leaving at least 0.5 m of operating space around it. Operating environment: temperature 5°C to 35°C, humidity ≤65% RH.
2.3 Операционные процедуры
During the test loading process, do not reach into the area of the clamps or the motor drive mechanism to prevent pinching injuries; test specimens must be securely clamped, as specimens falling out or weights dropping during the test may damage the equipment; it is strictly prohibited to disassemble the equipment’s drive mechanism or replace weights with non-original ones.
3. Обзор оборудования
3.1 Стандартная диаграмма
См. Рисунок 3-1.
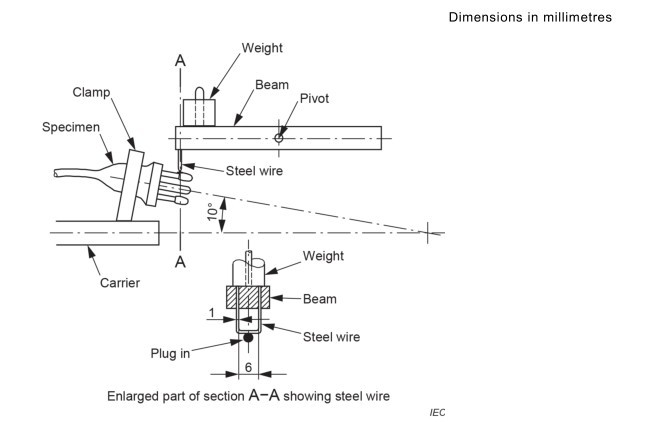
Рисунок 3-1
3.2 фотографии продукта
См. Рисунок 3-2.
| Номер регистрации | Внимание |
| ① | Выключатель |
| ② | взрыватель |
| ③ | Кнопка «Начать тестирование» |
| ④ | Кнопка остановки теста |
| ⑤ | кнопка сброса |
| ⑥ | Counter: The top line displays the current number of tests, and the bottom line displays the set number of tests. |
| ⑦ | Motor drive rod and sensor: each full rotation is counted twice—once for each leg of the round trip. |
| ⑧ | Fixture for mounting the test specimen connector |
| ⑨ | Weight, 4 N |
| ⑩ | Стальная проволока |
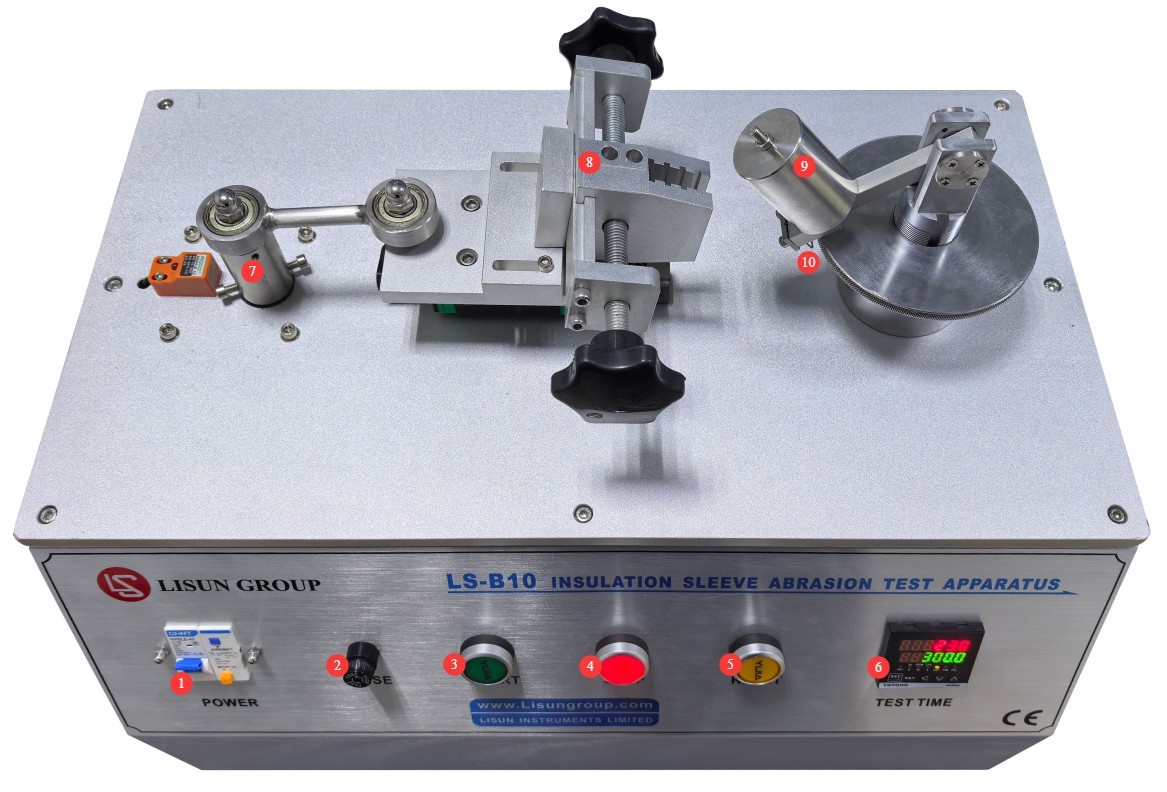
Рисунок 3-2
4. Wear Resistance Test for Plug Insulation Sleeves
4.1 Подготовка проб
Select finished plugs that are intact, undamaged, and have not undergone aging tests. The test must be conducted on one prong of each test specimen.
4.2 Пример установки и ввода в эксплуатацию
Refer to the standard diagram in Section 3.1 to install the test specimen. Press the “Start Test” button to begin the test, observe the wire’s friction travel, and adjust the position of the connector so that approximately 7 mm of the 9 mm wire travel is covered by the insulating sleeve. Once adjusted, press the “Stop Test” button, then press the “Reset” button to clear the count.
4.3 Настройка параметров и запуск теста
| инструкции | Внимание |
| ① | Press the counter setting button, then use the up and down buttons and the directional buttons to change the number of settings; according to the standard, the number of tests must be set to 20000. |
| ② | Press the Reset button to clear the current test data. |
| ③ | Press the “Start Test” button to begin the test. |
| ④ | During the test, observe the condition of the specimen and the steel wire. If any abnormalities are detected, press the “Stop Test” button, make the necessary adjustments, and then retry. |
| ⑤ | When the test is complete, the motor stops rotating; check the current test count to confirm that the test has been completed. |
4.4 Оценка результатов испытаний
After testing, the plug should show no damage that could compromise safety or affect future use; in particular, the insulated sheath should not be worn through or wrinkled.
5. Плановое техническое обслуживание и уход за оборудованием
5.1 Ежедневное техническое обслуживание после остановки
At the end of each day’s testing, clean dust and specimen debris from the equipment surfaces, and keep the clamps and slide rails clean and free of debris; check the steel wire for looseness or deformation; if it is deformed or damaged, replace it.
5.2 Еженедельное плановое техническое обслуживание
Apply a small amount of specialized lubricating grease to the equipment’s guide rails, drive screws, and bearings to ensure smooth, jam-free operation.
5.3 Техническое обслуживание при длительном хранении
After powering down and cleaning the equipment, apply rust-preventative oil to important components such as bearings, drive screws, clamps, and weights to prevent rust and deformation. Cover the entire unit with a dust cover and store it in a dry, well-ventilated warehouse. Power on the equipment for 30 minutes each month to prevent moisture damage to the components.
5.4 Требования к интервалу калибровки
Для обеспечения точности измерений и эксплуатационной надежности оборудования рекомендуется периодически отправлять его на калибровку в квалифицированную независимую метрологическую лабораторию. Рекомендуемый интервал калибровки составляет 12 месяцев. Пользователи могут определить конкретный интервал калибровки в зависимости от частоты использования, условий окружающей среды и требований системы качества.
6. Устранение неполадок и решение распространенных проблем
| Признаки неисправности | Возможные причины | Метод |
| The device did not respond after the test was started. | Loose power cord, blown fuse | Check the input power supply and power cord connections; check the fuse on the front panel of the device; if it is blown, replace it with a fuse of the same rating. |